Easy guide on how to create tables in Excel. By using a table in Excel, You gain ease in processing numbers, Fill in data automatically with formulas so that your reports are faster and more accurate.
Working with Excel has its own challenges, The level of difficulty of working in Excel depends on the complexity of the data to be processed. If you want to create a simple report table with basic mathematical operation formulas, but don't know how to create a table in Excel, You need to follow this guide.
This guide will show you the basics of Excel as well as how to create tables in Excel. Tables in Excel can be created in several ways, tables in Excel can be designed automatically using table style templates or manually just like create a table in Word.
List of contents
Introduction to Excel
In the Excel Workbook there are several worksheets called Sheet, innately present Sheet1, Sheet2 And Sheet3. You can add or delete sheet, You can also change the name sheet the.
Each sheet consists of many columns and rows, The meeting between columns and rows is called a cell. On cells This is where you can input and process data.
Each column in Excel is represented by the letter A, B, C and so on, and on each line is represented by a number 1, 2,3 and so on.
Cell identity is determined by the column name and row number that intersect each other. For example column A row 2, column B row 4, and so on. On Excel, To simplify it, just write the column names and row numbers. Example, column A row to 2 written A2, column B row to 3 written B3, and so on.
Basic Excel Tips:
- To refer to a cell, write the column name and row number. Example: B3.
- To highlight multiple cells across multiple columns and rows, written with a start cell and end cell, and separated by a colon. Example: B3:C9
- To enter data into cells, click on the cell, then type the data. To change cell data, double click on the cell.
- Apart from entering directly into the cell, data can also be entered via formula bar (formula bar).
- To move between cells, press the button Tab or Enter
- Writing formulas or functions must begin with the sign " = “
Entering Data into Table Cells
By default a table consists of one or more columns, Each column consists of a column title and column contents consisting of one or more cells.
To enter data as table column headings, do the following:
- click on the cell A1 then type the column title, example: NO,
- move to the next cell, by pressing the button TAB on the keyboard.
- then type the other column titles.

Also fill in other data in each column, like Name, NIK and so on. To move to the cell below it, press ENTER.
Adjusting Table Column Width and Row Height
You can adjust the column width and row height of the table as needed. To adjust the column width or table row height, do the following:
- Point the pointer at one of the dividers so that the pointer changes shape to a double arrow, Then
- click and drag right or left for column width,
- click and drag up or down for row height.
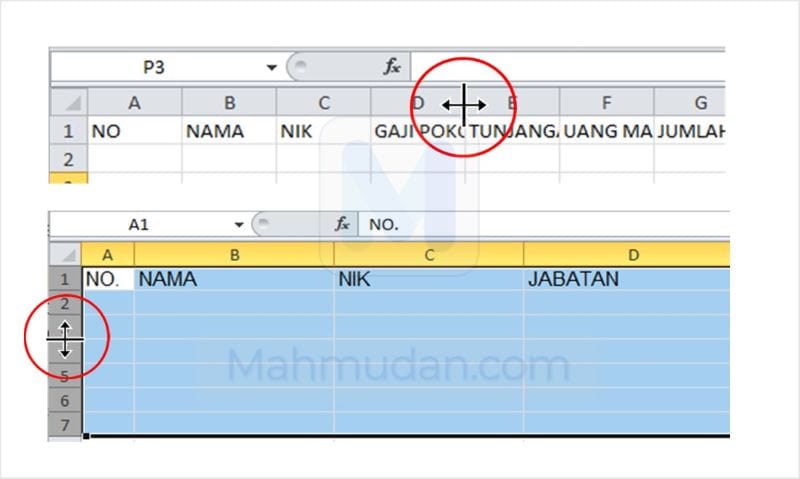
You can also adjust the column width or table row height automatically by double clicking on the column divider or row divider.
Creating Tables
On Excel, The definition of a table is slightly different from the definition of a table in Word. In Word, A table consists of one or more columns, each column consists of several cells.
Meanwhile in Excel, It is not enough for a table to just consist of column dividers, A table will be known as a table if it has been declared or named as a table.
Creating a table in Excel can be done in several ways, You can use Insert Table or Format as Table. By using these two tools, Excel recognizes that you have created a table and Excel activates tabs Table Tools – Design.
The table design tool provides a variety of table styles that you can use to quickly create tables in Excel. In addition to using the provided style, You can also design the table in your own style.
Insert Table
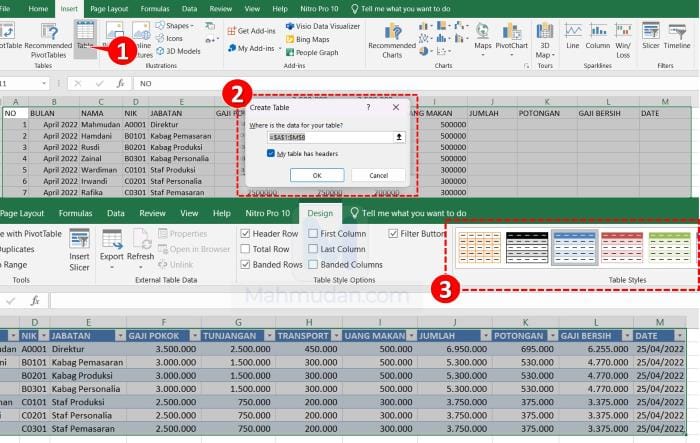
By using the menu Insert Table, The table will be designed according to the selected table style. The selected table style affects the color of the column header cells and the color of the table rows.
To use Insert Table, Highlight all the cells that you want to make into a table by clicking on the first column title then dragging to the last row in the last column. Then do the following:
- On the Design tab, in section Table Styles, choose the table design you like.
- Then select the tab Insert, click Table.
- On the dialog box Create Table, click My table has headers, then click OK
Format as Table
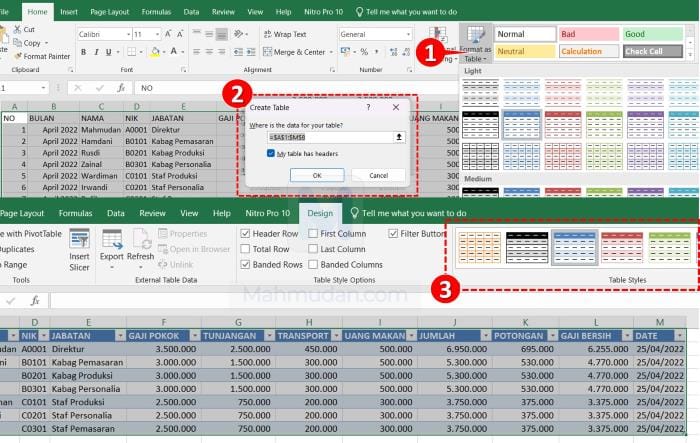
By using Format as Table, same as Insert Table, This tool will also design the table according to the selected table style.
To use Format as Table, Highlight all the cells that you want to make into a table by clicking on the first column title then dragging to the last row in the last column. Then do the following:
- On the tab Home, click Format asTable.
- On the dialog box Create Table, click My table has headers, then click OK
- On the Design tab, in the Table Styles section, choose the table design you like.
Designing Tables
With or without using the menu Insert Table or Format as Table, You can design the table according to your needs. By designing custom tables, You can make adjustments to your specific wants or needs for the table you create. You can add or remove border lines and change the color of each cell.
If you only design tables without using menus to create tables in Excel, You cannot use the table features provided by Excel.
Adding Border Lines to Tables
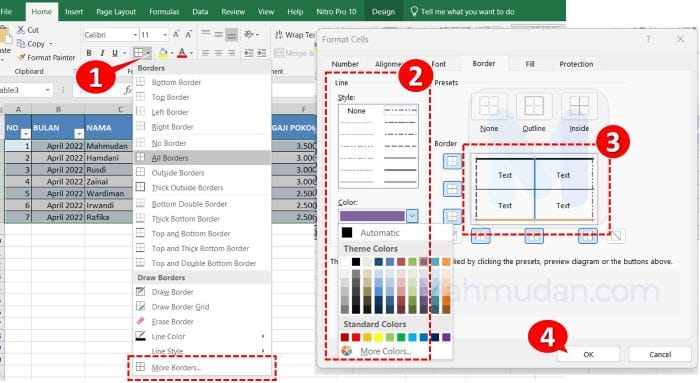
To add a dividing line to a table in Excel, highlight all the cells you want to add border lines to then do the following:
- On the tab Home, in section Font, select More Border.
- On the dialog box Format Cells, in the Line select the border style and color you want.
- In the Border, Click each side of the cell you want to apply the line style and color you have chosen
- Click OK to apply.
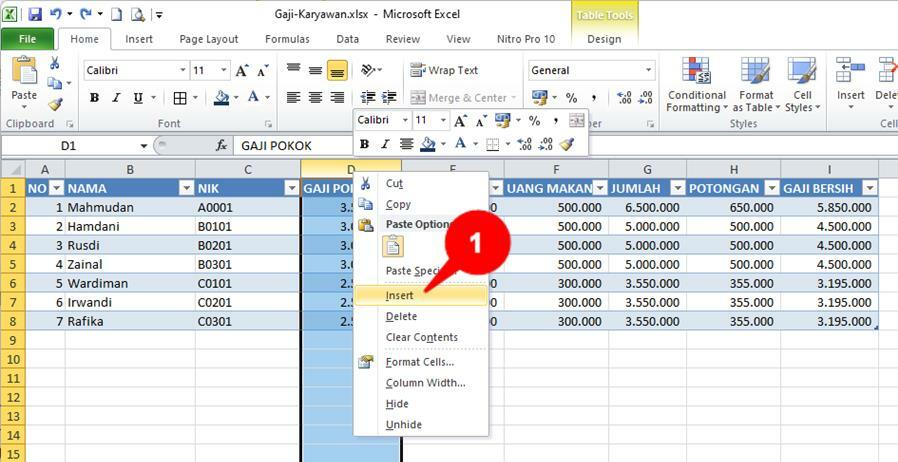
Inserting Columns in Excel
You can insert columns in Excel just like inserting table columns in Word.
- Right click on the column where you want to insert a new column, then click Insert.
Closing
The lesson about creating tables in Excel ends here first, will be updated at the next opportunity. Hopefully this quick guide can help you create reports with Excel.
Don't forget to save Workbook you, Fastest way to save (save) Workbook is with shortcut keys Ctrl + S. Press the button Ctrl and buttons s simultaneously.
After knowing how to create a table in Excel, you can create a Mail Merge in Word with Excel data
Hope it is useful
