This article contains 10 A basic guide to creating simple and attractive PowerPoint presentations. Suitable for beginners who are new to and learning PowerPoint as well as for those who want to improve their skills in making PowerPoint presentations.
What is presentation? Presentation is speaking or communicating in front of many people to convey an idea, ide, material, and as a resource person or other things.
Presentations must be carried out well so that they can be understood and attract attentionaudience. Therefore, presentation material is needed that is interesting and interactive and not boring. Creating a simple and attractive PowerPoint presentation is a challenge in itself.
The presentation material commonly used is slides. Slides are one or more pages that will be displayed in a presentation. Presentation slides can be created in many software, one of the famous ones is Microsoft PowerPoint.
If you want a clean and professional look, useSimple pre-made presentation slides can help keep your content clear and easy to follow.
This article consists of 12 A basic guide to creating sequentially arranged PowerPoint presentations, so that it is easy for you who are just learning to follow. You can find out how to organize slides, add text and objects, format text and objects on slides.
Follow and practice every step in this guide, if you encounter any problems, if there is a discrepancy between guidance and practice, please share in comments.
List of contents:
Tips for making PowerPoint Presentations Interesting
To create an attractive presentation, You can follow the following tips:
- Design your own presentation slides to be displayed or download the template which has been prepared. Using the default templates from PowerPoint makes presentations look boring because they are often used and tend to be stiff.
- Set the slide ratio to suit the screen resolution of the viewer used. A slide ratio that does not match the screen resolution means that the slide cannot appear on the full screen.
- Maintain the readability of the text by using high contrast between the background color and the text color but still comfortable to look at.
- Choose a font size and style that can be read clearly even from a distance.
- Use pictures as well add animation effects if it is necessary for some object in the presentation to attract attention.
Basic Steps to Make an Attractive Powerpoint Presentation
In this guide, The application used is Microsoft PowerPoint 2010. However, You can also practice it on newer versions, The only fundamental difference is the layout of an Object's Properties.
1. Select a Blank Slide
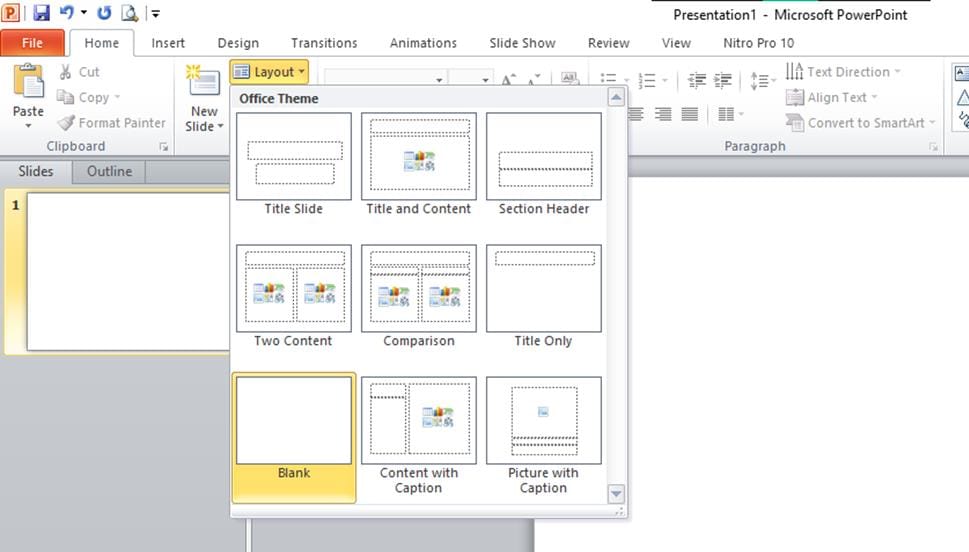
You can start by selecting a blank slide so you can freely determine the content layout yourself. To select a blank slide, on tabs Home click Layout then select Blank
2. Determining the Slide Size
After selecting a blank slide, Next you need to determine the size of the slide. This aims to adjust the slide ratio to the screen ratio. For example, the screen as a slide viewing medium has a ratio 4:3 then choose the slide ratio 4:3 Also, likewise if the slide viewer ratio is 16:9.
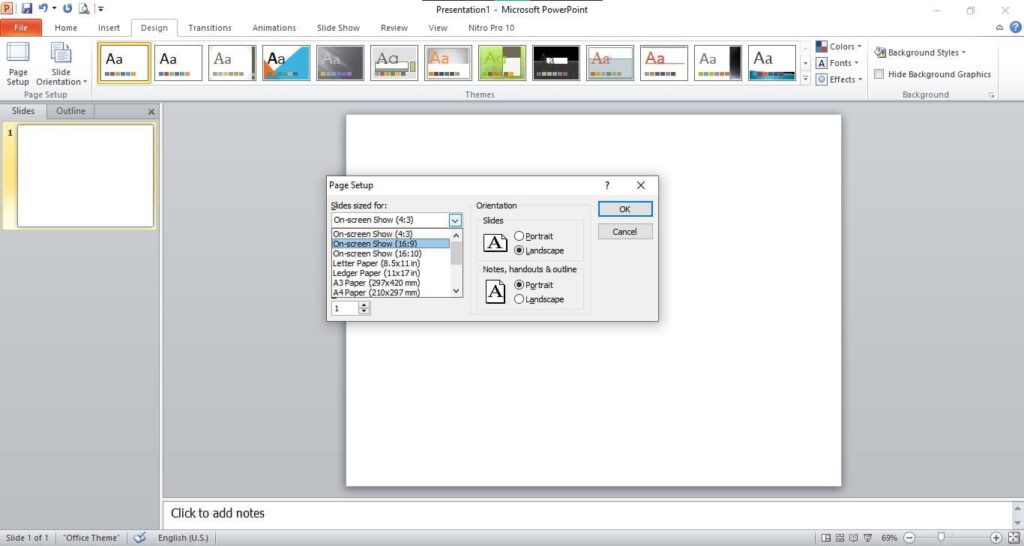
To set the slide size, click tab Design then click Page Setup, then a dialog box will appear Page Setup. In the field Slide size for Select the screen resolution ratio of the device you are using. On most modern computer screens, the screen ratio is 16:9
3. Designing Slide Backgrounds
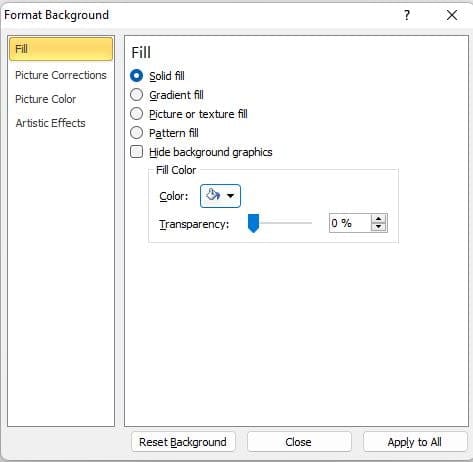
An important part of making a PowerPoint presentation attractive is to design your own slide background. You can determine the background color, textures and images. To add a background to a slide, right click on slide then select Format Background then the dialog box Format Background will appear.
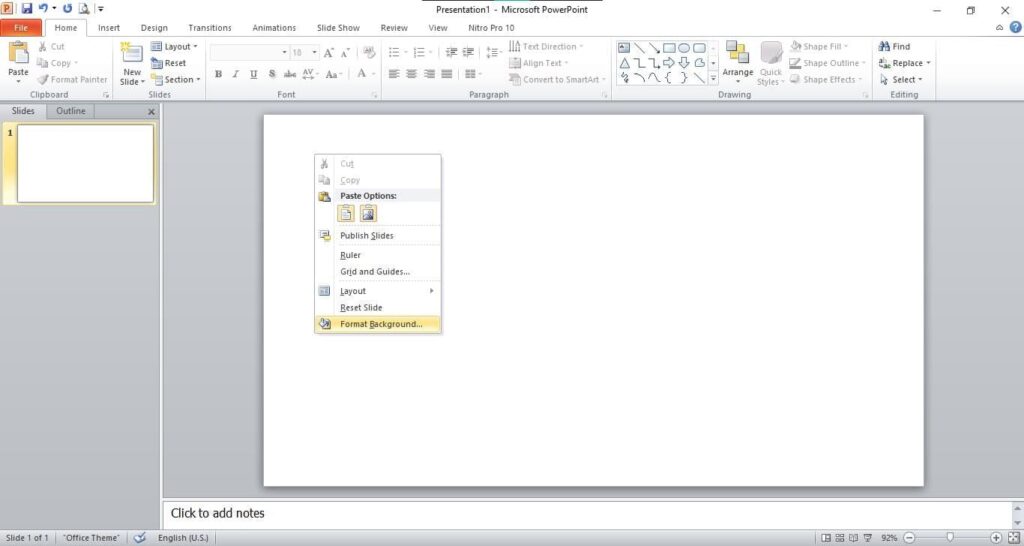
In the dialog box Format Background, There are several types of background options that you can use, namely Solid fill, Gradient fill, Picture or texture fill or Pattern fill. Select the type of background you want, example Gradient fill.
You can also choose to set the same background for all slides. Click Apply to All to apply the same background to all slides, or click Close to only set the background for certain slides.
4. Create Color Gradations on Slides
Color gradation is the transfer of one color to another. Color gradations can eliminate the stiff impression of slides. Color gradations can be applied to the background, form and also text.
4.1. Create Color Gradations on the Slide Background
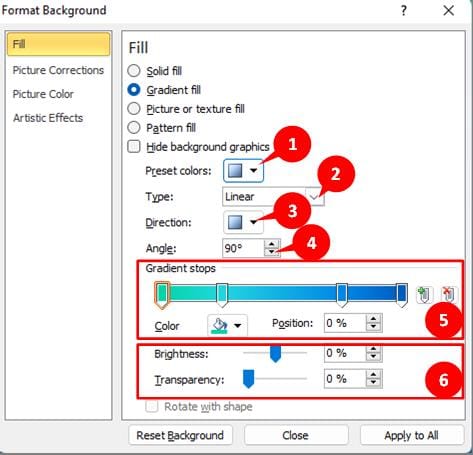
To create color gradations on the slide background, Right click on the slide then select Format Background. In part Fill choose Gradient fill, then arrange as follows:
- Select one Preset colors
- Choose Type gradation
- Choose Direction color gradation.
- Determine Angle (angle) color
- Click a marker Gradient stops then change the color on the option Color as desired (markers Gradient stops can be added or deleted)
- Also adjust the brightness and color transparency levels.
4.2. Create Color Gradations in Shapes
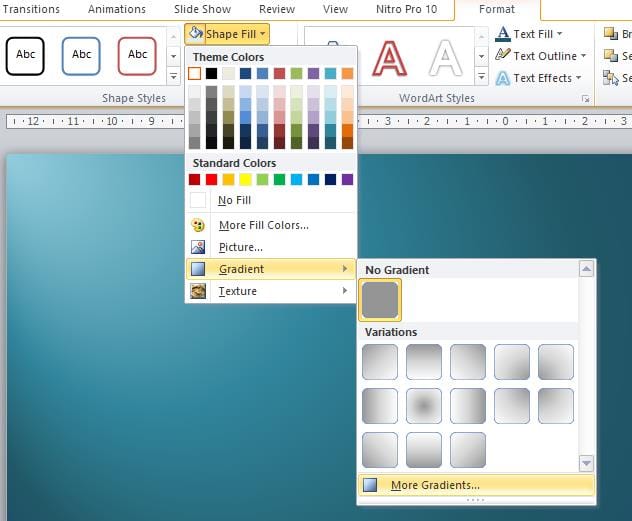
To create a color gradient in a shape on a slide, click shape then click tab Format Shape, then click Shape Fill Then select Gradient. You can choose the variations provided or decide for yourself by selecting More Gradient.
5. Adding Text to Slides
You can add text to slides in three ways, namely with WordArt, Text Box or Shapes. Basically these three types are one form rectangle, The difference between the three is plain text and text that has been formatted with styles.
5.1. Adding Text with WordArt
To add text to a slide use WordArt, click the menu Insert then click WordArt then select the desired style.
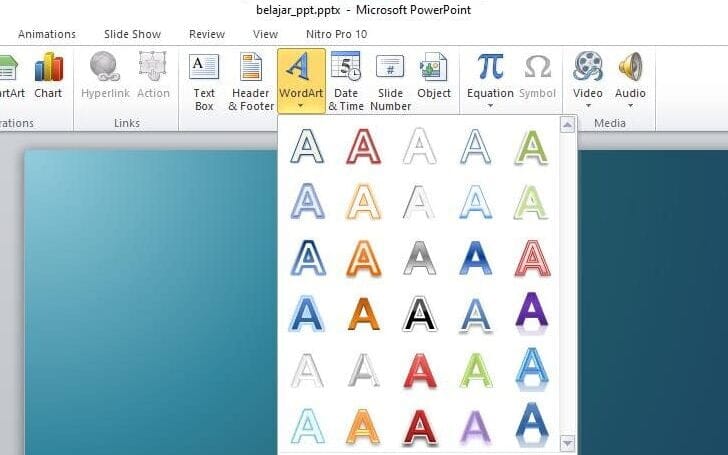
Then type text, for example "Computer Tutorial"

5.2. Adding Text with a Text Box
To add text to the slide, use Text Box, click the menu Insert then select Text Box then click and drag on slide, then type the text, example: "by"

After adding text, You can make the text more attractive by formatting the text on the slide by changing the size, font style and text color.
6. Formatting Text on Slides
Formatting text on slides is an important part of creating an attractive PowerPoint presentation. Formatting text aims to give an artistic touch to the text, so that the text becomes more beautiful and pleasing to the eye so that it attracts attention.
You can change the size, font style and text color, you can also change Text Box become WordArt. Besides that, You can also add other effects to the text such as Shadow, Reflection, Glow and others.
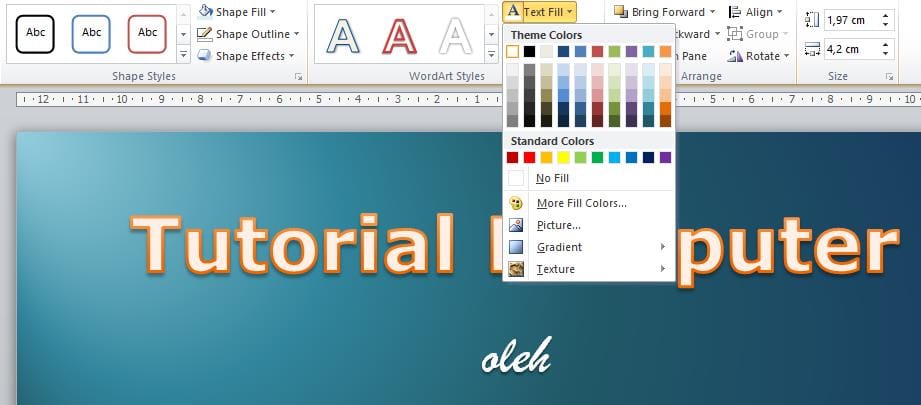
To format text, click Text Box or highlight specific text, then on the tab Format choose the color of the text through the color options onText Fill AndText Outline.
7. Adding Shapes to Slides
You can add various shapes to slides, create new shapes by combining several shapes. Besides that, You can also type text in the shape. To add shapes, follow these steps:
- On the menu Insert, click Shapes, select the desired shape for example a rectangle then click on slide,
- To add text, Click on the shape then type the text, example: “www.mahmudan.com”.
- Then adjust the size of the shape to the length of the text.

8. Formatting Shapes on Slides
As does text, You can also format shapes on a slide by decorating and adding effect styles to a shape.
8.1 Decorating the Fill and Outline of a Shape
You can decorate the shape's contents with color, picture, a particular texture or pattern. To decorate the contents of a shape, select a shape then on the tab Format, click Shape Fill then select the type of decoration you want. Example: Gradient->More Gradients
Example below, in part Fill using type Gradient fill, then on Preset colors using models Gold II.
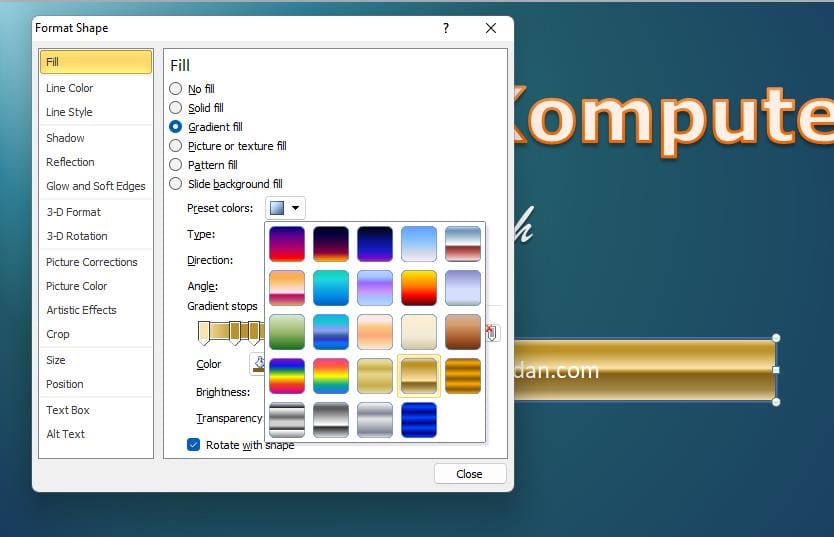
Notes: If you are using a newer version of PowerPoint, maybe you didn't find it Preset colors model Gold II.
To change the outline color of a shape, select a shape then on the tab Format click Shape Outline then select the desired color.
8.2 Adding Effect Styles to Shapes
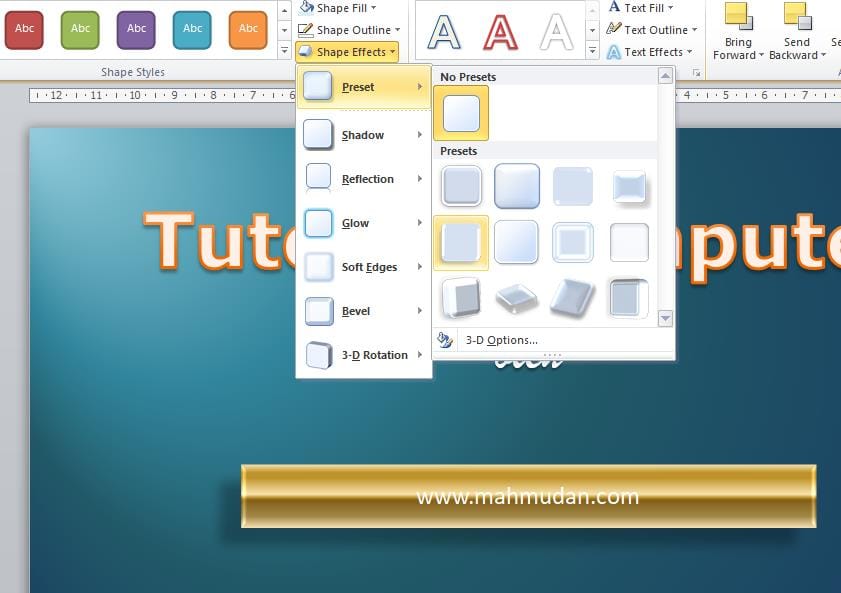
On a shape on the slide, you can add effect styles like Shadow, Glow, Reflection, or three-dimensional format (3D). You can also choose Preset display effects provided.
To add effect styles to shapes, select a shape, then on the tab Format, in part Shape Style, Then select Shape Effect that you want to add, example Preset -> Preset 5
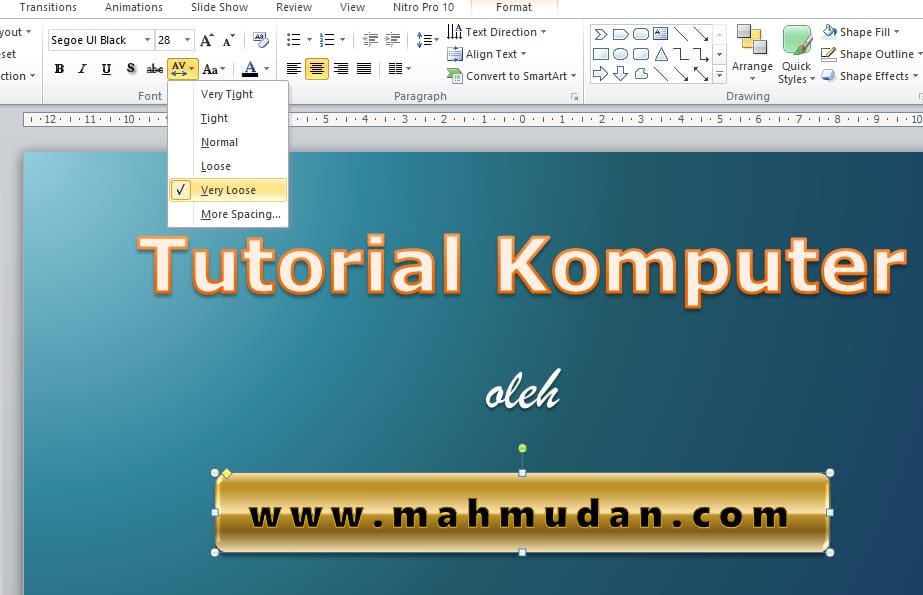
The text on a shape can also be styled as well as formatting the text. In the example below, using fonts Segoe UI Black size 28 then the letter spacing is very loose.
9. Adding Images to Slides
Adding images to slides is the right step in creating an attractive PowerPoint presentation. By adding images to the slide, Your slides will become more interesting and it will be easier for the audience to understand the aim and purpose of the presentation.
9.1. Inserting a Picture with Insert Picture
To insert an image on a slide, on tabs Insert click Picture then select the image you want to add.
9.2. Inserting Pictures using Shapes
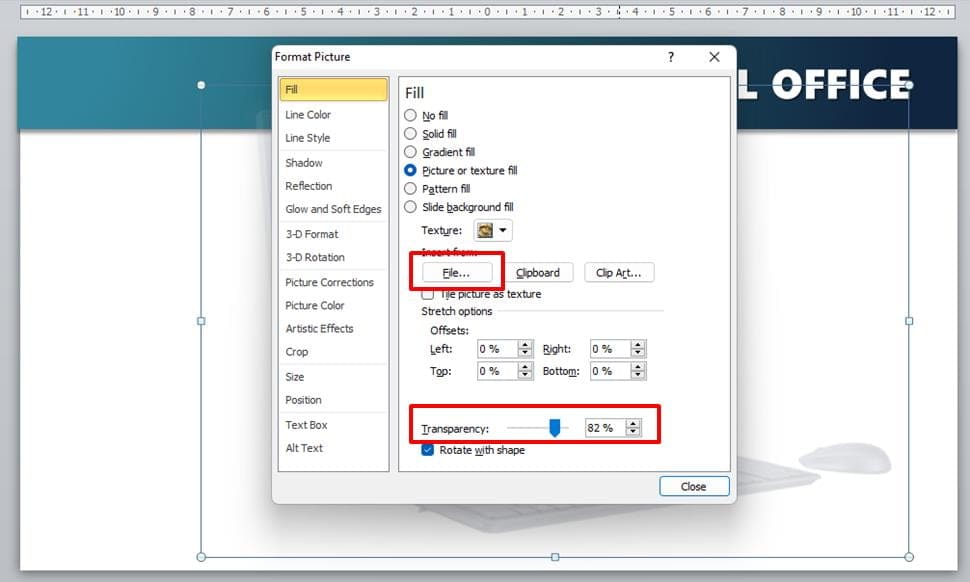
Apart from inserting an image with Insert Picture, You can also add images to slides using Shapes. With this way, You can set the image transparency level as well as image stretching options.
To insert an image into a slide use Shapes, do the following:
- Add a shape, for example a rectangle
- Right click on shape then select Format Shapes, in part Fill choose Picture or texture fill, then select the desired image by clicking the button File…
10. Setting the Object Position
Objects in PowerPoint are everything that is in a PowerPoint presentation, objects can be shapes, picture, text, audio, videos and more, either on the canvas or outside the canvas area.
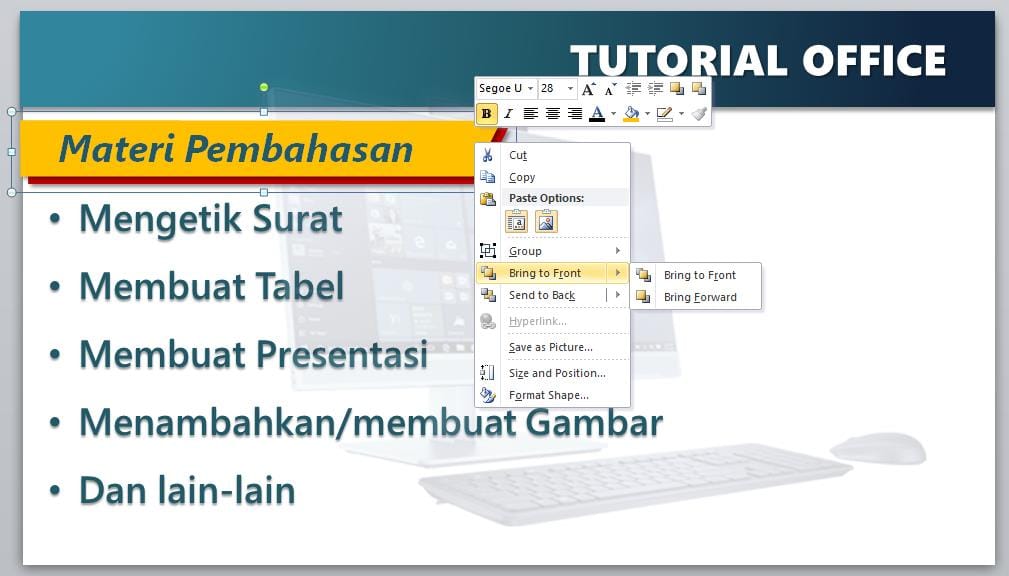
In creating attractive PowerPoint presentations, there will be main objects and additional objects. When you create or add lots of objects and they overlap each other, You need to arrange certain objects to be in front or behind other objects.
Arranging the position of these objects is important so that the content can be seen clearly and is not messy. Additional objects so as not to block the main object.
To adjust the position of the object, right click on the object and select Bring to Font (the object is in front) or Send to Back (the object is behind)
Added Animation
After mastering ten materials, create a PowerPoint presentation, You can continue by adding animation effects to the presentation slides. Adding animation effects in PowerPoint can give a lively and interesting touch to presentation slides. With animation, you can reinforce important points, organize the flow of information well, and increase audience interest in your presentation.
Adding animation effects to PowerPoint presentations requires more effort and may also be an interesting challenge for you. Therefore, we have made it specially Guide to Creating Animations in PowerPoint – 5 Basic Practice
Duplicate Slides
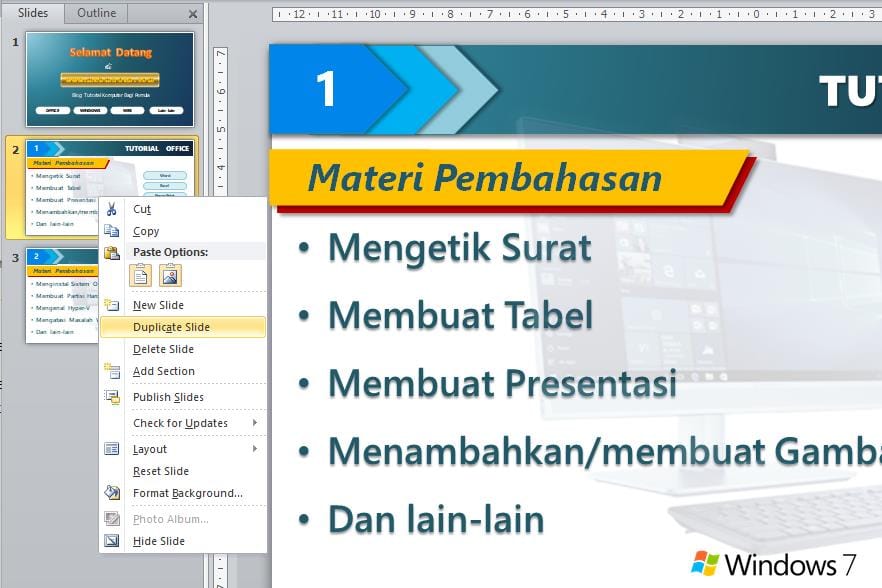
Duplicate slide can save time and energy because duplicating a slide will copy whatever is on the slide, including the effect style and animation of each object, timing and also slide transition effects.
By duplicating the slide, You can maintain consistency in the style and effects of objects on the slide. You only need to change and adjust the content of the text on each slide.
If you create a slide with the same style of effects and animation added, It is best to duplicate a slide after all the objects on the slide have been added with effects and animation styles.
To duplicate slide, right click on slide then click Duplicate Slide
Showing PowerPoint Presentation Slides
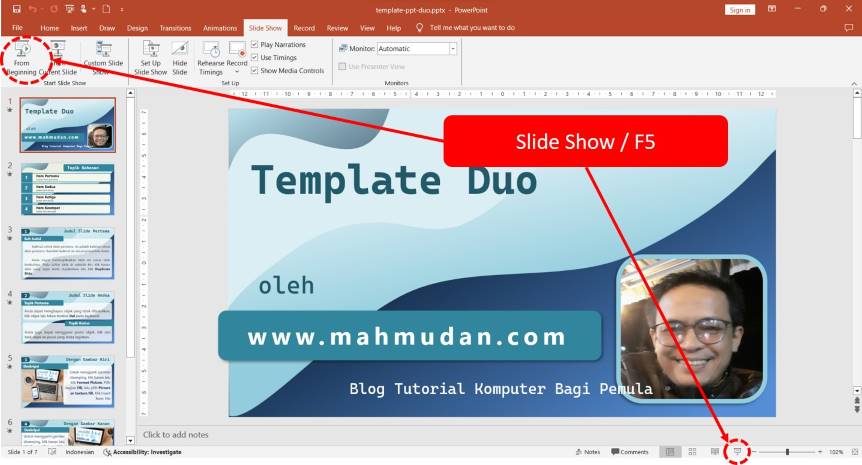
There are several ways to display the PowerPoint presentation slides that you have created, The first way is to click the tab Slide Show then select From Beginning, or From Current Slide.
The second way to show slides is by clicking the icon Slide Show located at the bottom right of the PowerPoint application screen or by pressing the button F5 on the keyboard, This method is faster and more practical.
Conclusion

By dominating 10 The basic guide has been explained above, You can create a simple but interesting PowerPoint presentation. If you Add animation effects in PowerPoint, Your presentation becomes more lively and attracts the audience's attention.
If you prefer video tutorials, Watch the video tutorial for making a PowerPoint presentation below
Hope it is useful.

