If you have ever tried to create an automatic table of contents but failed, no need to worry. Following 3 Easy steps for creating an automatic table of contentsWord.
Creating an automatic table of contents is quite easy, it only takes a few clicks. But before doing that, You need to ensure that your writing style complies with the writing rules known to Microsoft Word..
By following this guide, You will know how to use Heading styles in writing, how to modify the Heading style and how to create an automatic table of contents in Word. You can also find out the advantages compared to the manual method.
You can practice this guide to creating an automatic table of contents in Word in Word 2010 as well as newer applications such as Word 2016, Word 2019 or Word 2021.
List of contents
Create an Automatic Table of Contents in Word
So you can create an automatic table of contents in Word, You need to ensure that your writing style complies with the writing rules recognized by the Microsoft Word application. This is important so that Microsoft Word can recognize which text is a subtitle and a sub-subhead.
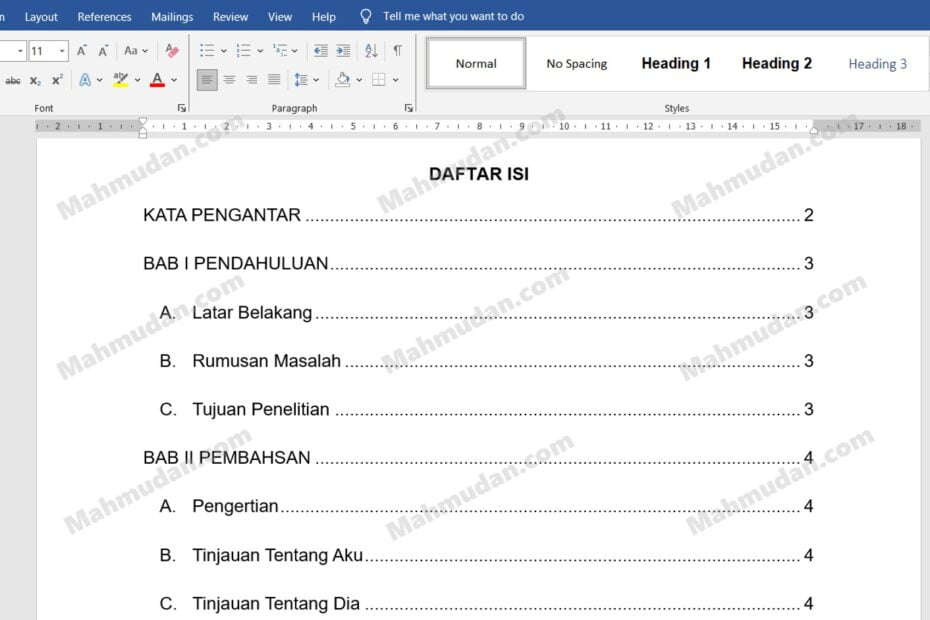
From Microsoft Word available Style so you can apply it to your writing. Some of the styles provided are Normal, Heading 1, Heading 2, Heading 3 and so on. By applying a heading style to your writing, Word can recognize subtitle and sub-subhead text so that with it you can create an automatic table of contents in Word.
Therefore, before creating an automatic table of contents in Word, The first step you need to do is apply the style heading in your writing.
Apply Headings Style
In a written work, You may often come across the title, subtitle, as well as subtitles, some also use the term chapter, subchapter, and other derivatives.
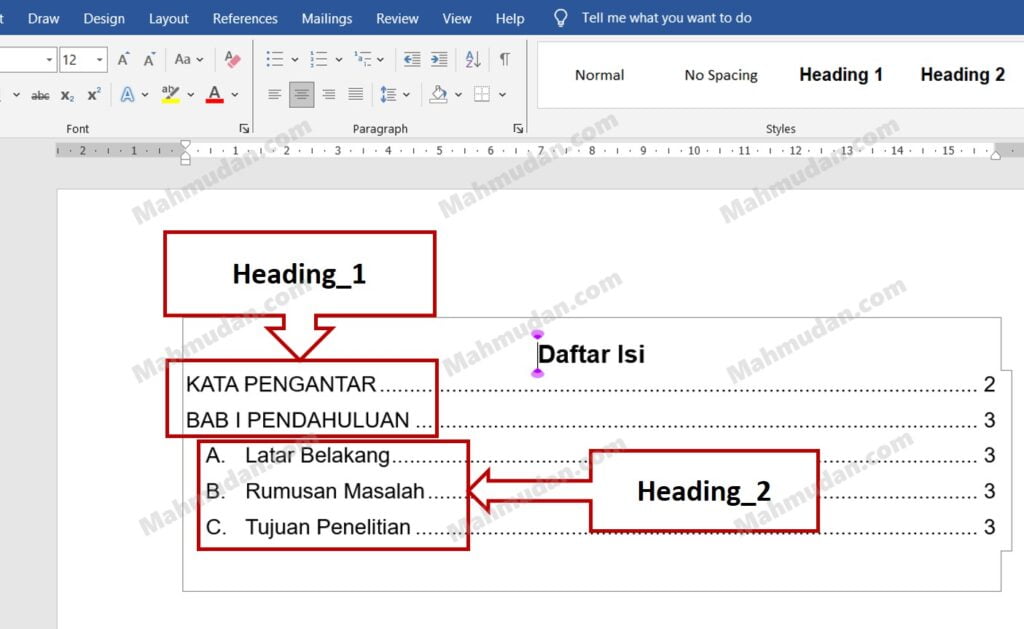
For example in this guide, the first subtitle text is “CHAPTER I INTRODUCTION“. So that Microsoft Word can recognize text “CHAPTER I INTRODUCTION” as a subtitle, You need to apply style Heading 1 for the text.
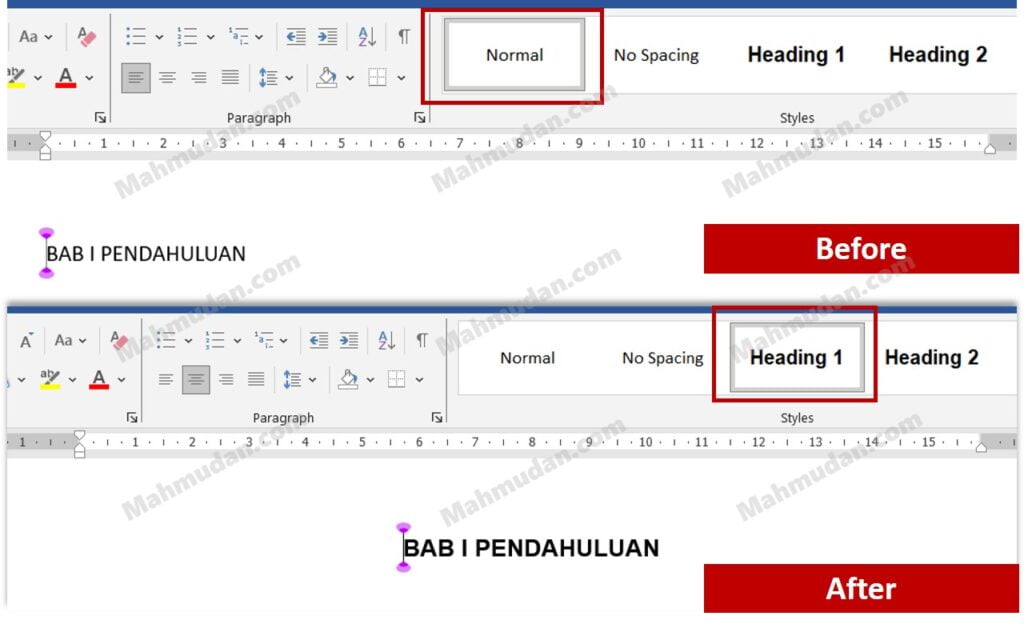
To apply a style Headings on the text, do the following steps:
- Click on the subtitle text line,
- Then click style Heading 1 which is located onHome in theStyle.
- Repeat step number 1 And 2 on every other subtitle as well as style Heading 2 in each sub-subheading.
After you apply the styleHeading 1 on the text “CHAPTER I INTRODUCTION”, then the text format will change according to the styleHeading 1.
You may come across that format Heading 1 does not match the format of the other text in your writing, therefore you need modify the Heading style to suit the format you use.
Headings Style Modification
Modifying Headings Style is changing the font type, colors and other settings for Heading styles.
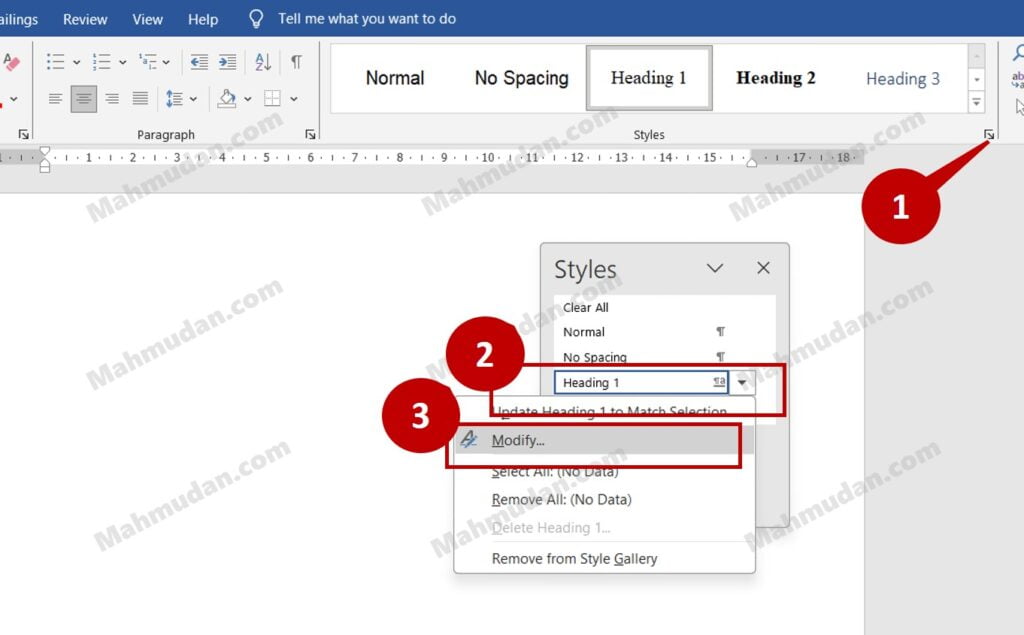
To modify the Headings style, follow these steps:
- Activate the menu Style by clicking the icon in the lower right corner of the section Style or by pressing a button Alt + Ctrl + Shift + S
- On the menu Style, point the pointer to Heading 1 so that a triangle icon appears then click on the icon.
- Choose Modify to modify the Heading style
- On display Modify Style, change the text style to match your desired format. You can change the font type, font size, colors and other settings. For example in this guide, for style Heading 1, The format used is text Bold with center alignment, font size 12 or 14. You can determine it yourself according to your writing needs.
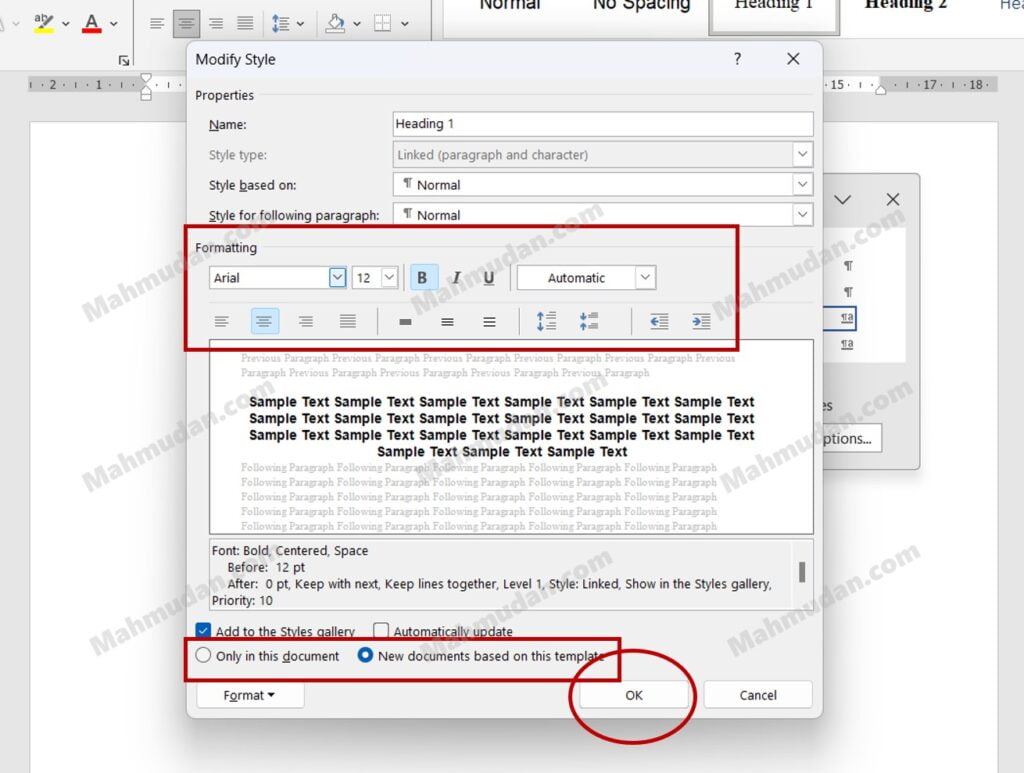
You can choose to apply this format to every new document or only to the document you are working on. If you want to apply as default style, select New document on this template, then click OK to implement changes.
After modifying Heading 1, You can repeat the steps above to modify Heading 2, Heading 3 and so on.
Add Automatic Table of Contents
After you apply the appropriate Heading style to your writing, You can add an automatic table of contents in your documents. Usually the Table of Contents is created on a separate page, after the title page.
To create an automatic Table of Contents on a new page, follow these steps:
- Insert Blank Page.
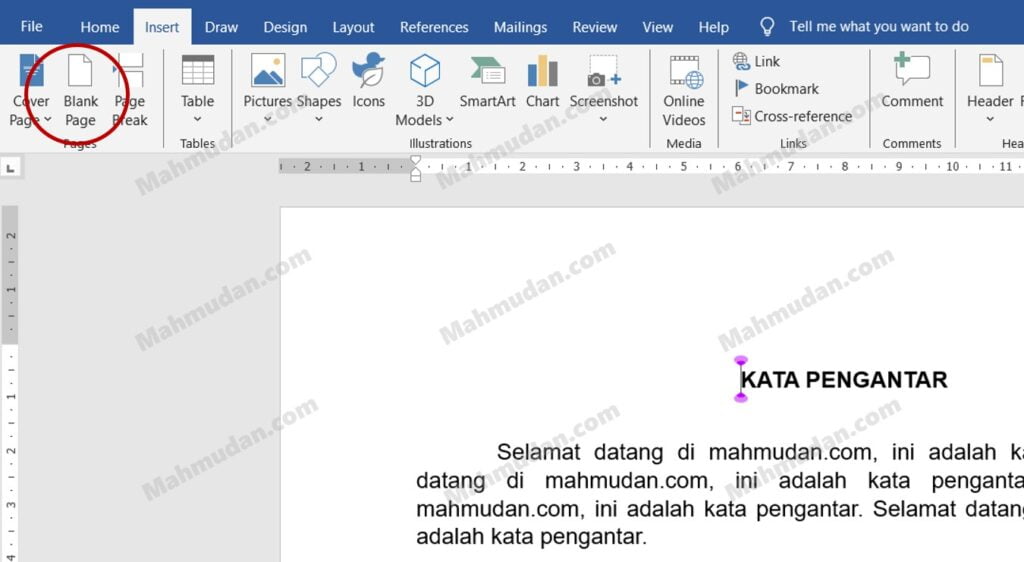
To insert a blank page, Place the cursor at the beginning of the page then open the tab Insert then click Blank Page.
- Add Automatic Table of Contents
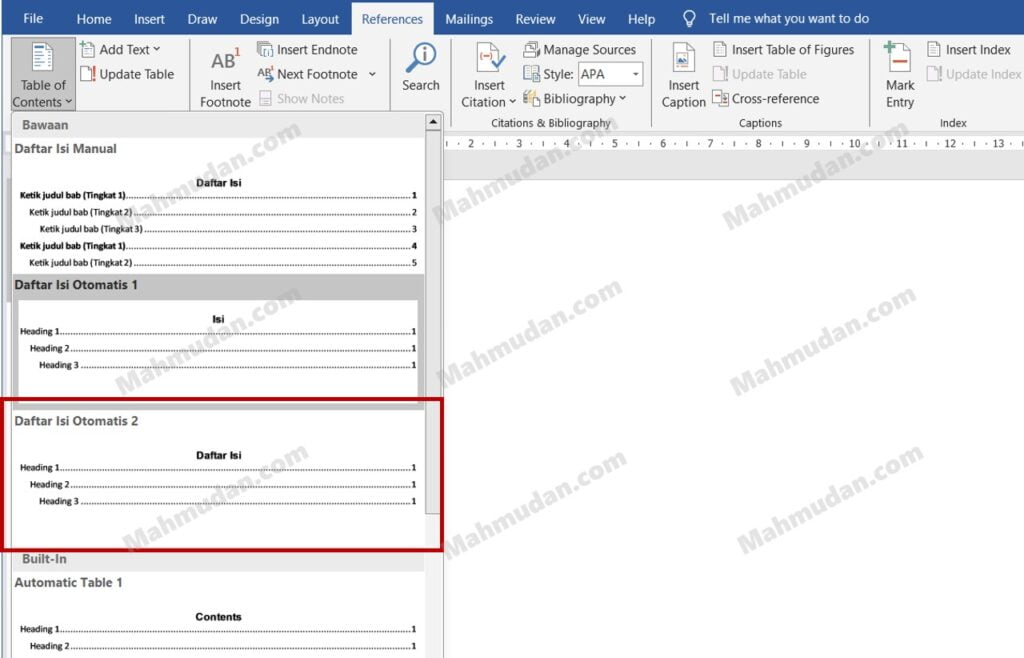
On the blank page you just created, open tabs Referances then click Table of Contents then select Automatic Table of Contents 2
Microsoft Word will automatically create a Table of Contents based on style Heading that you have applied previously.
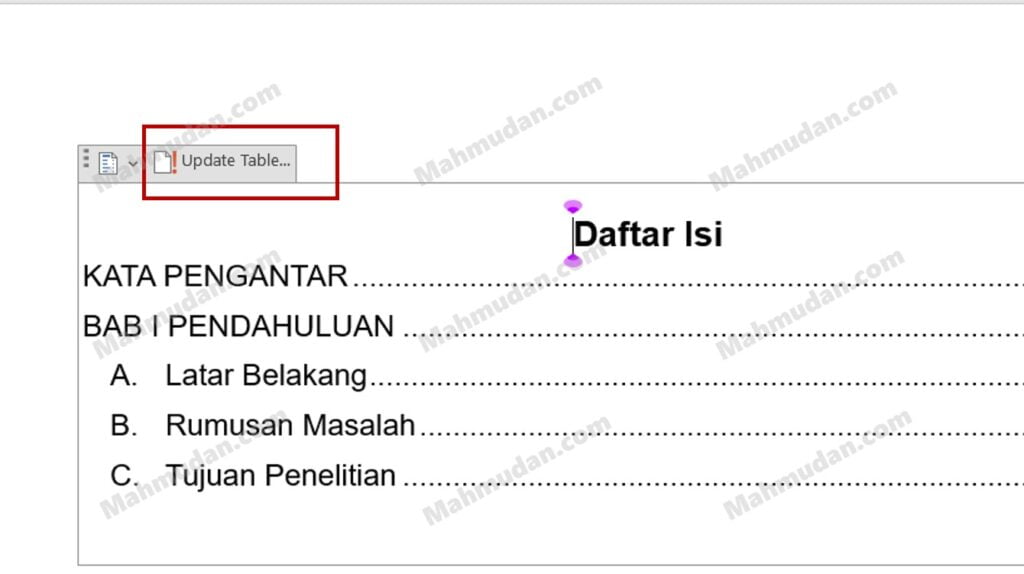
If you have made changes to the document that affect the subtitles or page numbers of the subtitles and/or sub-subheads, You can update the contents of the Table of Contents by clicking Update Table.
You can also format text in the Table of Contents as you would regular text.
Closing
Creating an automatic table of contents in Microsoft Word is quite easy if you have applied the Heading style in writing. By using an automatic table of contents, You can save time and energy, because you no longer need to type subtitles and subtitles, or page numbers manually.
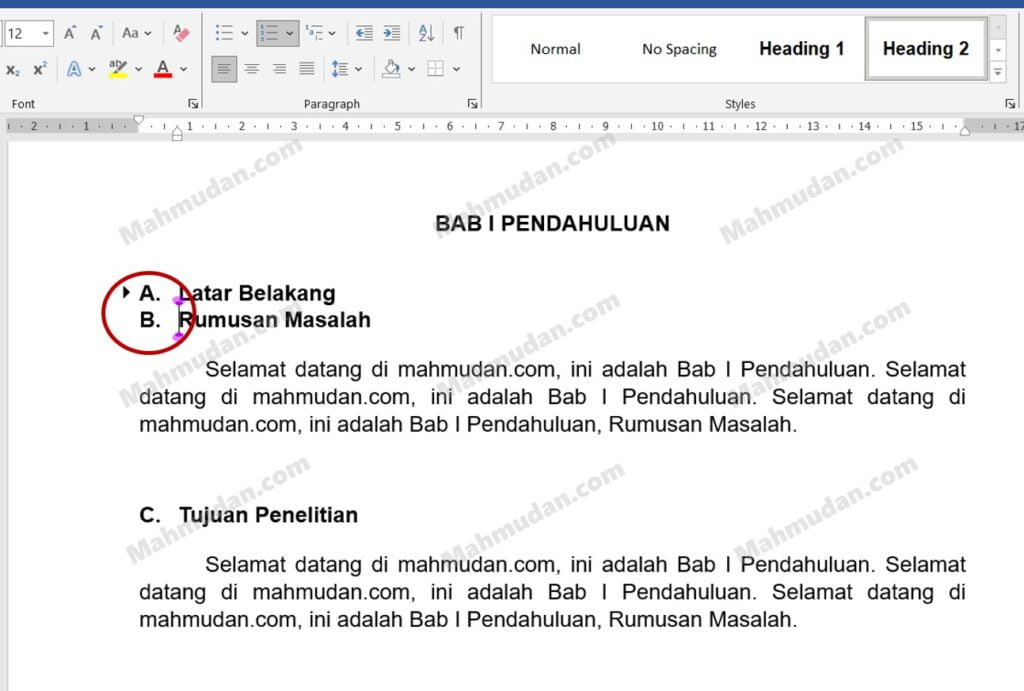
By using an automatic table of contents, all things related to the table of contents will be created automatically. Besides that, by applying style Heading on writing, when you hover the pointer over subtitle or sub-subhead text, A triangle will appear at the beginning of the text.
By clicking on the triangle, You can “close and open” the paragraphs below it. This really helps you in navigating Word documents. You are easier to display, read, and edit your Word document.
To make it easier for you, You can download and use an example of an automatic table of contents in Word
Hope it is useful.
fantasgic publish, very informative. I ponder why the other experts of thiks sector don’t realize this.
You must proceed your writing. I’m sure,
you have a huge readers’ base already!
Feel free to visit mmy homepage ::
Thanks for your personal marvelous posting! I seriously enjoyed rreading it,
you are a grfeat author. I will bee sure to bookmark your blog aand will come back down the road.
I want to encourage that you continue your great job, have a nice morning!
Here is my web-site …
Wow! After all I gott a web site from here I can actually get useful facts regrding my study and knowledge.
Feel free to visit my page: Fausto
Comments are closed.