Guide to learning to type in Word – training to make affidavit. For those of you who want to master or improve your typing skills in Word, This simple guide is easy for you to follow.
This guide will explain to you every important part you should know about how to type in Word properly and correctly. You will be able to know how to choose the paper size, how to set margins, how to format text, how to organize paragraphs, as well as how to use tab stops and copy formatting.
In learning to type in Word, we will practice making a statement letter. This aims to ensure that we can master every important part of the Microsoft Word application. These parts are very influential in creating a written work or official letter.
This guide uses the Word application 2010 as a source of images at each step, You can also practice the steps in this guide on newer versions of the Word application.
List of contents:
Word Introduction
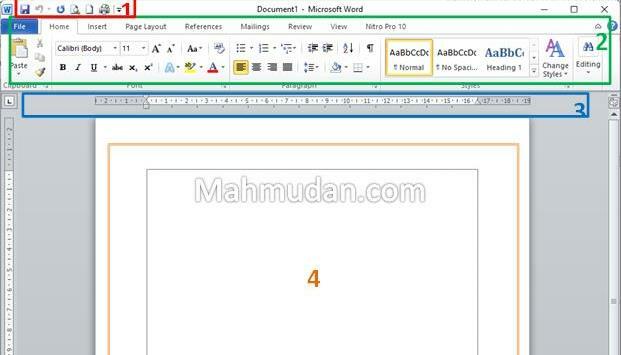
Before starting to learn to type letters in Word, we need to know or be familiar with every part of the Word application. Following are the basic parts of Word that we should know:
- Toolbar. In order, here there is a shortcut menu to save (Save), cancel changes (Undo), cancel cancel changes (Redo) and create a new document (New). We can customize the toolbar as needed.
- Tab Menu, Microsoft named this section as Ribbon. Each tab contains various tools with various functions such as changing the paper size, change the type and type of font, insert image, and others.
- Horizontal Ruler. Some of the functions of the horizontal ruler are to set the initial indentation of paragraphs, paragraph boundaries, paragraph endings and tab stops (tab stop).
- Paper work, section or place for typing, we can adjust the paper size according to needs.
Shortcut Keys in Word
To increase typing speed in Word, we can use shortcut keys on the keyboard. Some frequently used keyboard shortcut keys in Word:
- Order Copy or copy can be done with the button Ctrl + c
- Order Paste or paste can be done with the button Ctrl + v
- Order Save or save can be done with the button Ctrl + s
- To cancel the changes made (Undo) can be done with a button Ctrl + z
- To cancel cancel changes (Redo) can be done with a button Ctrl + y
- Making bold letters can be done with a button Ctrl + b
- Making letters italic can be done with a button Ctrl + i
- Making letters underlined can be done with buttons Ctrl + u
- To print typing results, you can use the button Ctrl + p
For advanced level, You can learn 10 shortcut key functions in Word to become a Professional
Learn to Type in Word
1. Selecting Paper Size
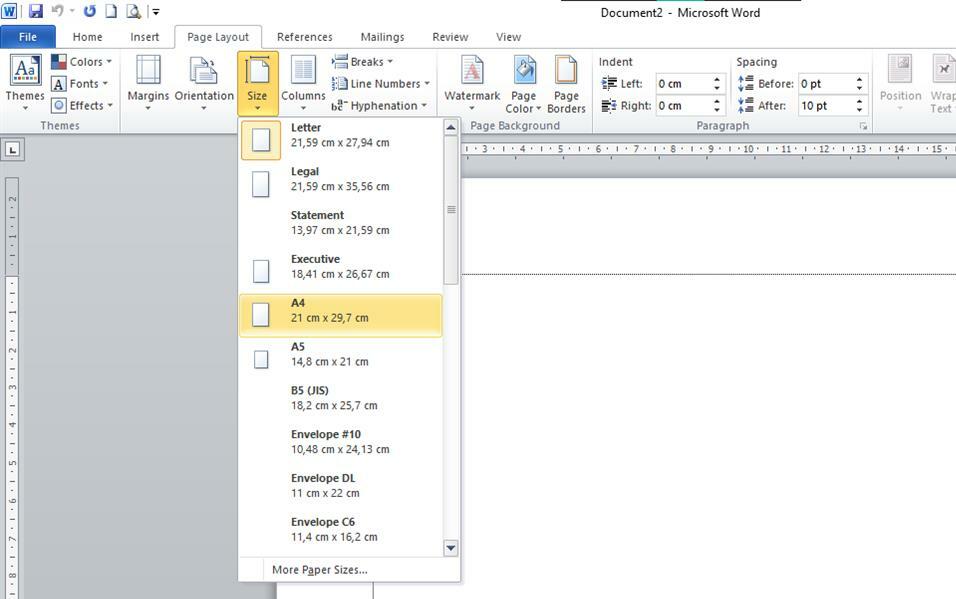
Before starting typing, We need to choose the paper size in Word to match the paper size installed in the printer. We should choose the paper size at the start of work, This is to avoid changes to the layout of the text or other content in the Word document due to adjusting the paper size.
To select the paper size in Word, click tab Page Layout, click Size then choose the size according to your needs. For example in this tutorial, the size chosen is Letter
2. Determining Paper Margins
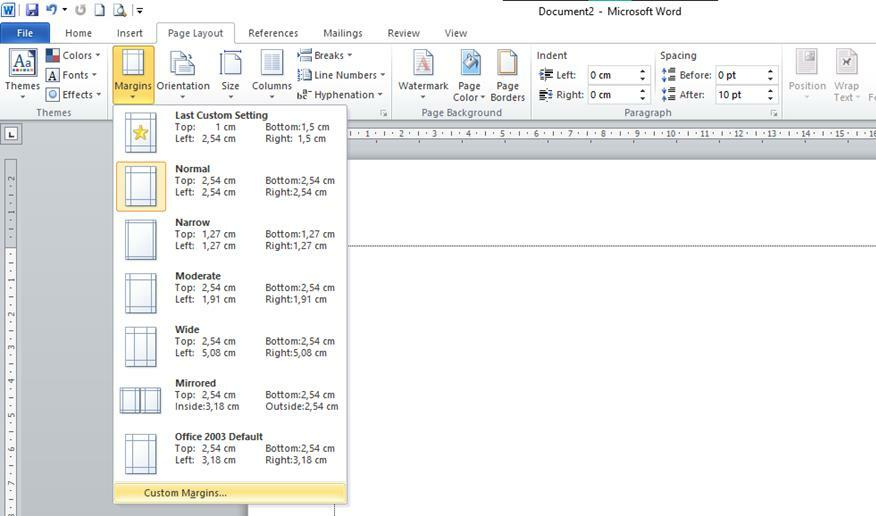
Paper margins are borders that function to regulate the distance of text or other components to the edge of the paper. The way to determine paper margins in Word is as follows:
- Click the menu Page Layout, click Margin then select Custom Margins
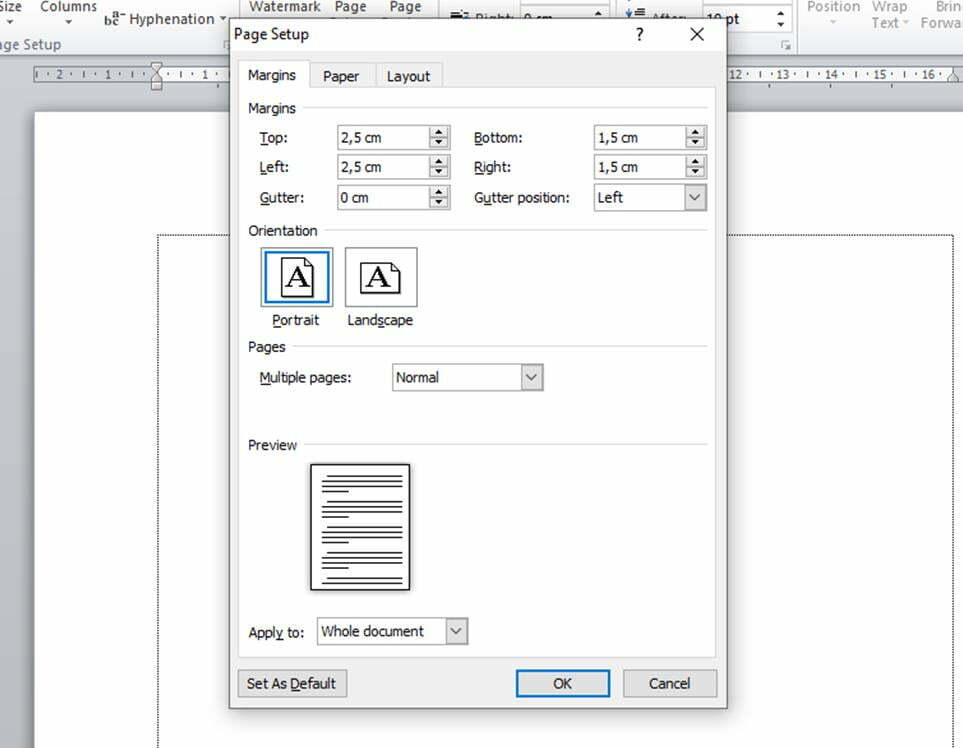
- On the dialog box Page Setup, on the tab Margins fill in the numbers in the fields Top, Left, Bottom, And Right. Set the margins as follows:
- Top 1 cm
- Left 2,5 cm
- Bottom 1,5 cm
- Right 1,5 cm
- Then click OK to apply
3. Typing Text
Typing text is quite familiar to us today, We are used to typing text on smartphones every day so it probably won't be difficult. The position of the letter we will type is marked with the cursor.
For new documents, By default the cursor will be at the top of the document. As a start, Type the following text for the title of the letter you want to create: income certificate
After typing the text, we can continue with formatting the text.
4. Formatting Text
4.1. Make uppercase or lowercase letters
On the menu Home, see section Font, we can change the font type from small to large or vice versa.
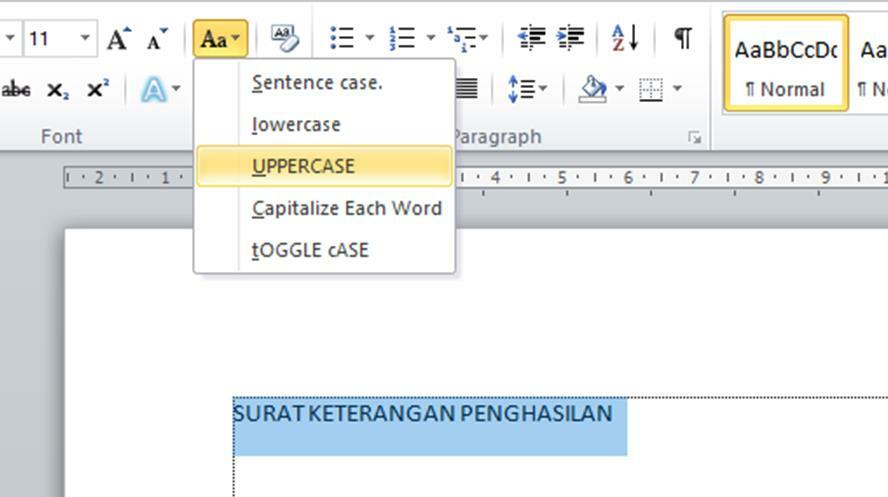
The title we make should use capital letters, but at the beginning we typed it in lower case, then we have to change it to uppercase.
To format text, we need to highlight it first. To highlight text, Double click on the part you want to highlight, or click and drag from the beginning to the end of the letter.
Highlight the entire title text and then the menu Home click Change Case then select UPPERCASE.
4.2. Change font style and size.
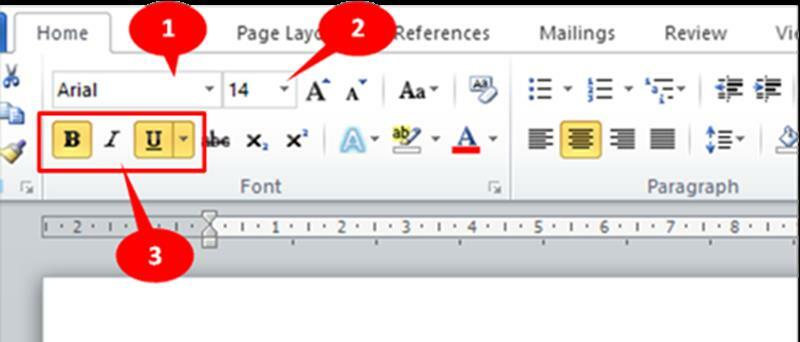
On the menu Home, see section Font, there is a choice of styles, font type and size. For all the letters in this letter we use the font Arial, for the title we change the size to 14 in bold style (Bold) and underlined (Underline).
Highlight all title text, then adjust the font style and size as below.
- Font Arial
- Size 14
- Letter thick and underlined.
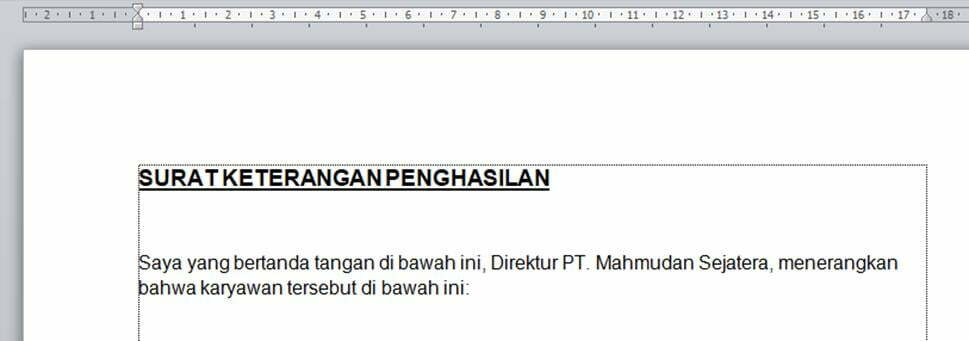
After creating a title, Continue by creating the body of the letter in a new paragraph. Follow these steps:
- Press Enter twice to move to a new paragraph
- Change the text alignment to align both left and right sides.
- Change the font size to 12, normal font style (not bold and not underlined)
- Type a sentence like the following below
After typing the text in a new paragraph, Next is organizing the paragraphs.
5. Organizing Paragraphs
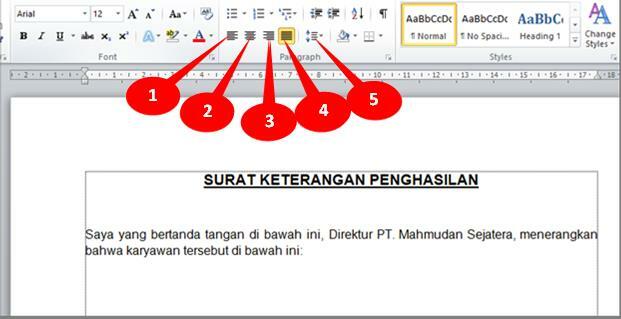
For writing purposes, we can adjust the alignment of paragraphs and the spacing between lines in paragraphs. The paragraph setting options in Word are as follows:
- Align left
- Flat middle
- Align right
- Align both left and right sides.
- Distance between lines..
5.1. Paragraph alignment.
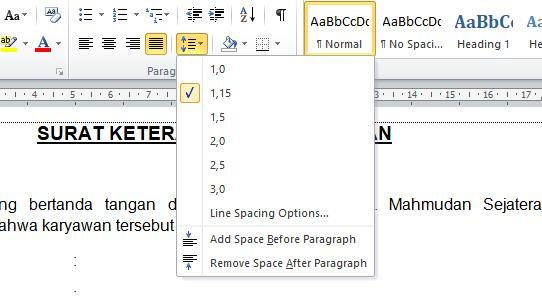
To set paragraph alignment, Click on the paragraph you want to organize, then on tab Home in section Paragraph Select the alignment type according to your needs (look at the picture). For the title, we set it to be centered, while we set the next paragraph to be aligned on both the left and right sides.
5.2. Set the distance between lines.
In this guide, The distance between rows used is 1,15. You can adjust it according to your needs. You can also add spaces before and after paragraphs.
5.3. Indent the first line of a paragraph.
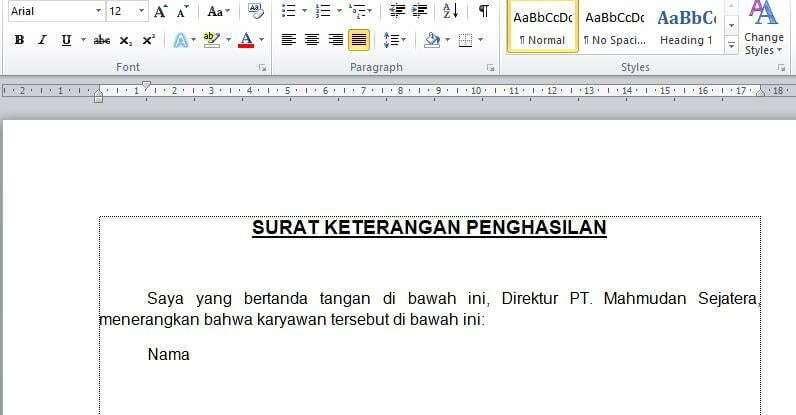
To indent the first line of a paragraph, place the cursor at the beginning of the paragraph and press the tab key. When we press Enter to start the next paragraph, its first line will be indented automatically.
6. Create a Tab Stop
An important part of learning to type in Word is using tab stops (tab stop). With tab stop, we can determine the starting position of a text. We can create the same tab stops for each paragraph so that the tabs are neat even if the length of the paragraph text varies. Besides that, we can shift the tab to the left, kanan, or to the middle.
In paragraphs that contain data such as names, position and others, usually separated by a colon. We set the position of the colon using the tab stop.
To create a tab stop, do the following steps:
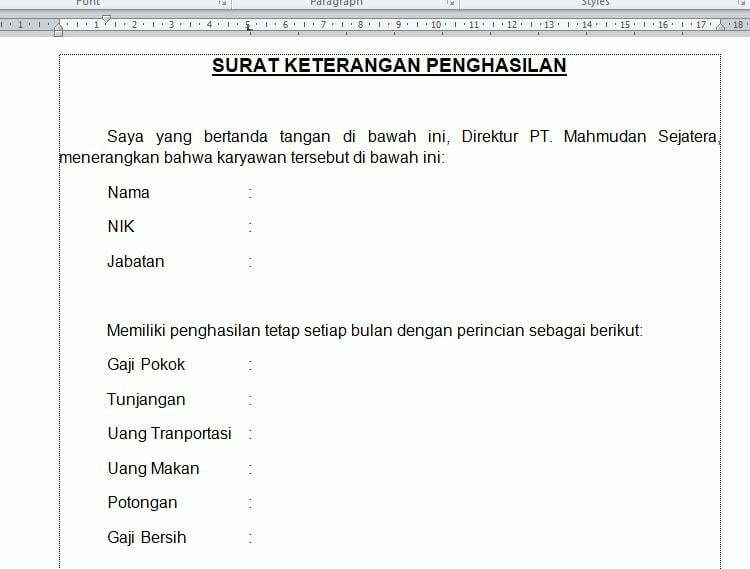
- Place the cursor at the end of the text No, then click on the horizontal ruler where we want the tab stop. In this guide, tab stop is created in position 5cm from the left margin, see ruler. You can customize.

- After you click on the ruler, The tab stop marker will appear on the ruler.
- Press tab, then type colon.
- The colon will be aligned with the tab stop. When we press Enter to start the next paragraph line, The paragraphs will have the same tab stops.

- Continue by typing the next line, like NIK, Department and others. Once finished the results will look like below:
7. Set Tab Stop
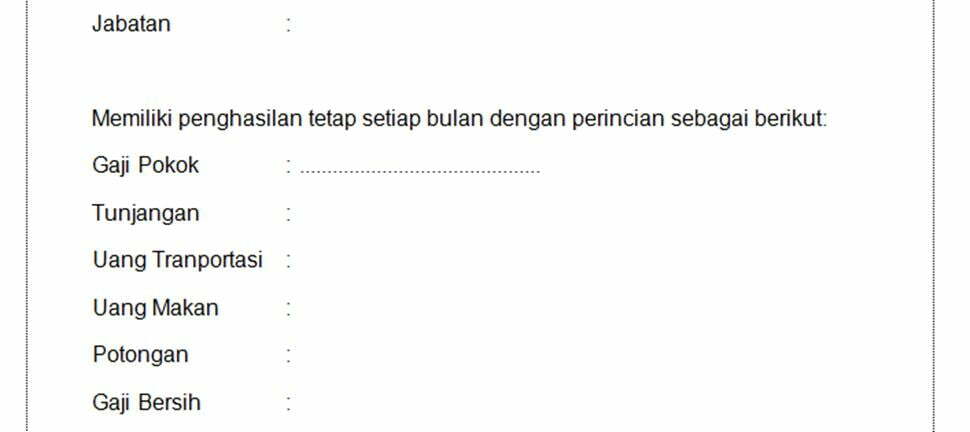
Apart from setting the tab stop position, we can also adjust the text alignment using tab stops. On the Basic Salary line, after the colon will be filled with numbers. Numbers are usually written right-aligned, for that we need to create one tab stop with right alignment. Here are the steps:
- Place the cursor after the colon on the Basic Salary line.
- Then on the horizontal ruler, double click on the distance 10cm, then the tab dialog box will open. Here, we can set the tab alignment, in section Alignment select Right. In part Leader select by dots.
- Then click OK to confirm.
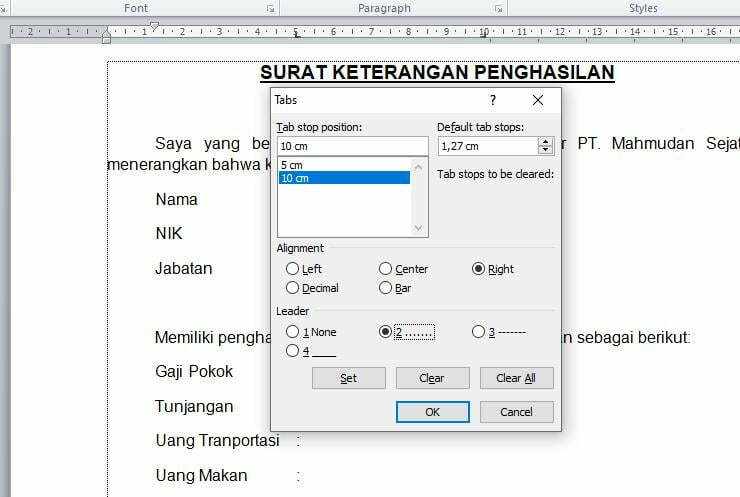
- Results using right aligned tab stops with Leader dot, dot, dot.
8. Copy Format
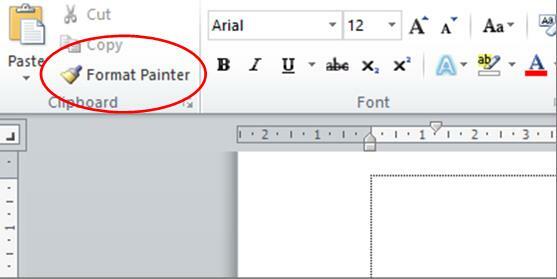
To format the next paragraph line, we don't need to create a new tab stop. We can copy existing formats using Format Painter.
Click on the Basic Salary line and click Format Painter, a brush icon attached to the pointer, then highlight the Benefits row up to the Net Salary row.
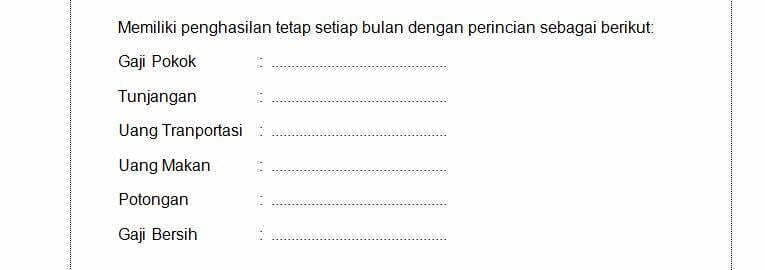
The Basic Salary to Net Salary lines have the same tab stop. Press tab after the colon on each of these lines. The result will look like below.
The next stage is to write a closing sentence. Place the cursor at the end of the Net Salary line Enter twice to create a new paragraph.
9. Deleting Tab Stops
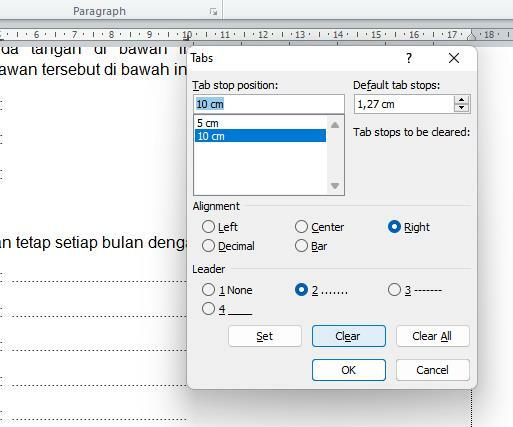
At the moment, we have one left flat stop tab and one right flat stop tab. We can remove unnecessary tab stops. When typing the final paragraph, we don't need the right flat stop tab, then delete the right aligned tab stop.
To delete a tab stop, Click the stop tab then drag it down. Or, Double click the tab stop so that the tab dialog box opens, then select the position you want to delete, namely 10cm, then click Clear Then OK.
After removing the right aligned tab stop, we continue by typing the closing sentence. We will make the closing sentence as in the example below.
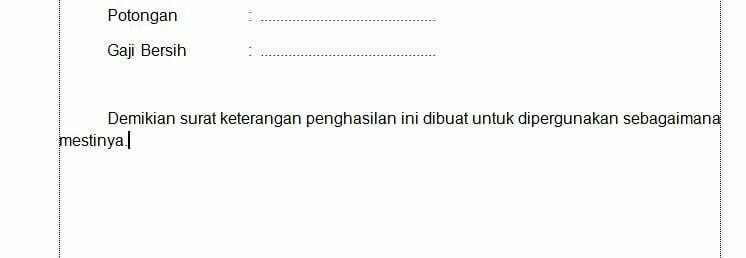
After typing the closing sentence then Enter twice to move to a new paragraph.
10. Move Tab Stop
After adding a closing sentence, In each letter, information about the author of the letter is required. On this affidavit, The information that needs to be created is information about the place, date, department, and the name of the person making the affidavit.
The position of the information text in the letter varies depending on the party who wrote it, some on the left and some on the right. To set the position of the text, we can use the existing tab stop and move its position.
We can move the tab stop position to the left or right. To move the tab stop click and drag the tab stop to the desired position. In this guide the tab stop position is at the number 10 on a ruler, After pressing tab, the cursor position moves parallel to the number 10, as in the following image.
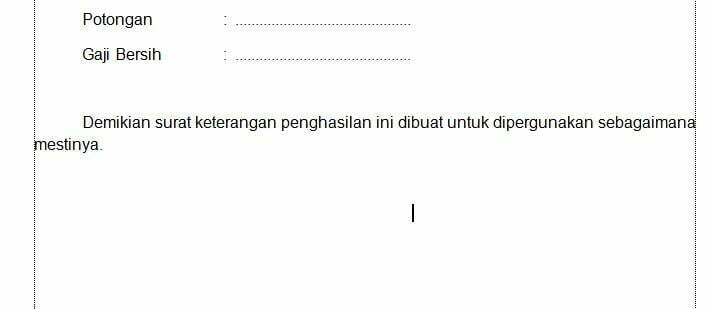
After moving the tab stop, Type the text about the required information as in the example below
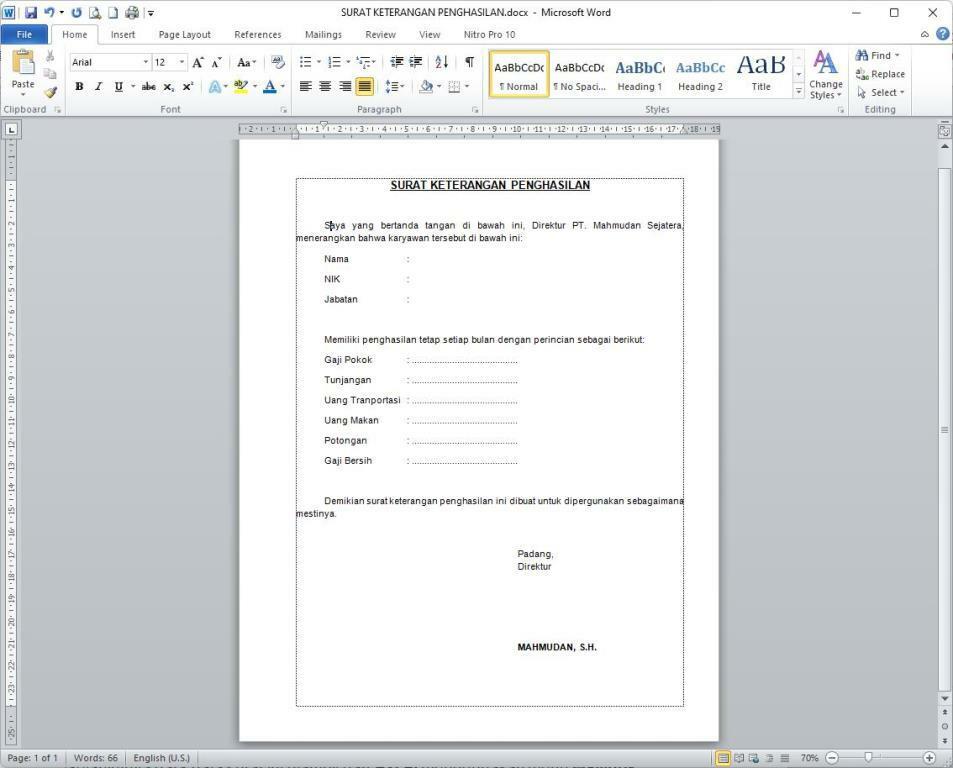
After you type in information about the letter maker such as place and date, position and name, then the process of making a certificate has been completed. You can download example of a Letter of Evidence / Statement made based on this guide.
If you make a large number of Income Certificates or other letters that have the same format, you can using Mail Merge with Excel as the data source.
If the letter you want to create contains a table, Complete guide to creating tables in Word this will help you.
If you make an official letter with a letterhead, You can learn how to make a letterhead in Word.
Closing
After following this guide to learning to type in Word, Hopefully you can understand how to type in Word properly and correctly. You already know how to use the important parts that are very necessary for typing in Word.
Hopefully this learning guide to typing in Word can increase your knowledge and improve your typing skills in Word.
Watch other video tutorials at Channel Youtube