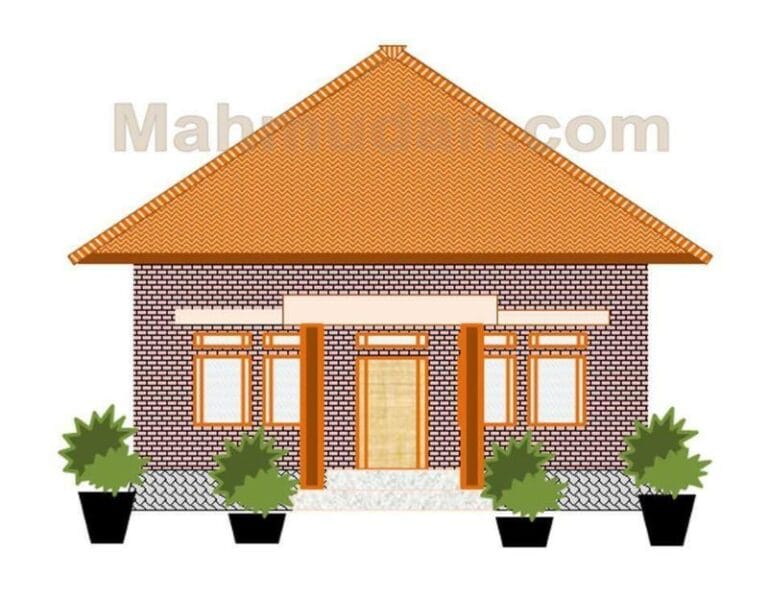
You can draw a house in Word as learning material for children or as a design for the house you want to build. This guide to drawing a house with Word is suitable for you and your children because it is easy to practice
You can create any image by utilizing the applications that you frequently use, namely Microsoft Word. Microsoft Word or Word provides a tool that allows you to create a shape, This tool is located on the tab Insert -> Shapes.
With Shapes, You can add a shape to a document Word or combine several shapes to create a more complex picture or shape, for example a picture of a house, building, mobil, location plans and so on according to your creation and imagination.
In this tutorial we will practice drawing a simple house using Microsoft Word. The picture of the house we will make consists of 3 main part, namely the foundation, walls and roof. Besides that, we will also make a picture of the door, window, and plants so that the picture of the house looks more real.
List of contents:
Steps to Draw a House with Word
Open Microsoft Word then click menu Insert then click Shapes. When you click Shapes, You can find various shapes that we can use to create house images.

1. Make a picture of the house foundation
We will start by making a picture of the house foundation in a trapezoidal shape. On tabs Insert, choose Shapes then in part Basic Shapes choose Trapezoid.

Click anywhere on the document Word, then you will see a shape like the image below

You have successfully created a trapezoid shape, but the length and width are not appropriate so it doesn't resemble the picture of the house foundation, therefore we need to change the size.
2. Changing The Size And Position Of Shapes
Select the shape you want to change the size and position of. When you select a shape or picture in Word, Dots will appear on each side, just say his name Resize Dot

Move the pointer to one Resize Dot, until the pointer turns into a double arrow (Resize Pointer active).

Moment Resize Pointer active, click and drag the pointer to resize it.

To change position, point the pointer to the center until the pointer changes into a four-way arrow (Move Pointer active) then click and drag to the desired position.
3. Making Home Wall Pictures
The wall we will make is rectangular, on tabs Insert choose Shapes, lau on part Rectangles choose Rectangle

We can create the shape of a house wall with the starting point above the picture of the house foundation that has been created by directing the pointer directly above the foundation..

Click and hold and drag the pointer up, then to the right along the foundation a little less. If the size and position of the wall image are not what you want, You can change its size and position by repeating steps number 2.

Until here, we have a shape that resembles the picture of the foundation and the wall of the house, Next is to make a picture of the roof of the house.
4. Make a picture of a house roof
The roof we will make is a triangular shape, on tabs Insert choose Shapes, then on section Basic Shapes choose Isosceles Triangle

Place the triangle shape on top of the wall shape, so the result is more or less like the picture below.

On a Word worksheet, We already have several shapes arranged which almost resemble a picture of a house consisting of a foundation, wall, and roof. The next step is to change the color of each shape and add images of other parts of the house.
5. Applying Pattern and Color to Shapes
In the Word application, a form consisting of 2 part is the content (Fill) and outline (Outline), now we will give the appropriate color to the fill and outline of each shape we have made.
Right click on a shape, then select Format Shapes.
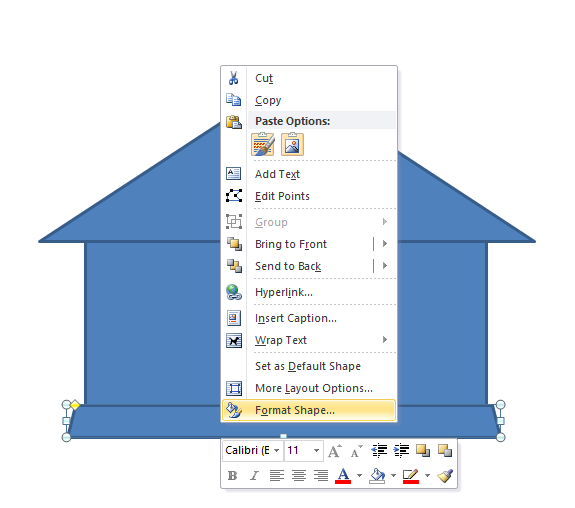
In the dialog box Format Shape, There are many options that can be applied to a shape. On this occasion we will only apply it to the content section, line color and line style.

For foundation drawings, in part Fill we give a pattern or pattern. Click Pattern fill, then select the appropriate pattern, for example Shingle which resembles the shape of stacked stones. On Foreground Color And Background Color You can choose according to taste, for example gray or black.

In part Line Color, choose Solid Line, on Color choose black.

Part pad Line Style, change Width to 0.25pt

If it is already, close the window Format Shape, the results will look like below. We have a shape that resembles a picture of the foundation.

Next, you can set the color and pattern for the walls and roof by repeating the steps number 5 on.
If you want the walls of your house to look like bricks, You can choose Horizontal Brick as a pattern of contents in the section Pattern Fill. For the roof, You can use Zig Zag which looks like a tin roof. If it is finished, the result will be approximately as below.

Drawings for the three main parts of the house have been completed, next is to make pictures of small parts such as doors, windows and so on.
6. Make a drawing of the doors and windows of the house
To create pictures of doors and windows, You can use a rectangular shape or another shape. On this occasion, Door and window images are created using shapes on the part Flowchart -> Predefined Process.

Adjust the size and color of the selected shape by repeating the steps number 2 And number 5, until it becomes like below.

You can copy the above shape into as many window images as needed, change the size and color to create the shape of the door and ventilation. Place it in the right position until the result is more or less like the picture below.

Drawing a house with Word is almost complete, You can add other parts, for example plants to make the image of your house more beautiful.
Besides Copy-Paste, a new shape can be created by rotating (Rotate) original form and or by merging into Group.
7. Rotating Shapes
We will practice rotating a shape to create images of plants and pots. Select a shape, for example Explosion 1 which is located in the section Star and Banners as a picture of a plant leaf, copy and paste until it becomes 2 fruit.
Select one of these shapes, when you select a shape, will appear Rotate Dot. Move the pointer to Rotate Dot until the pointer changes to Rotate Pointer, click then drag right or left to rotate the direction.

Make another trapezoid shape then rotate it so it looks like a plant pot.

Currently we have three new forms, two leaf shapes and one pot shape, we will merge it in Group
8. Combining Shapes in Groups
Move the position of the leaf shapes and pot (click and drag) so that they are close together so that they resemble the shape of a plant. Select the three shapes by pressing and holding the button Ctrl on the keyboard, then click on the shapes.

Right click on all three then select Group Then select Group.

When several shapes have been combined in a group, they become a new form, can be copied or played at once. If successful, the shape of leaves and pots that have been combined into a picture that resembles a plant.

Copy-Paste picture of the plant until it becomes several fruits, then place it in the appropriate position to beautify the image of the house. Also add other accessories to make it look more real.
Final Result of House Drawing

After all the house elements are added, The final result of the house image will look like the image above. How did you make the results?? Is the result the same as the final image in this guide?
Save Home Photos
From the components you have created using Shapes, a picture of a house has been formed. You can save the house image as a default image in PNG or JPG format.
To save it as a default image in PNG or JPG format, follow these steps:
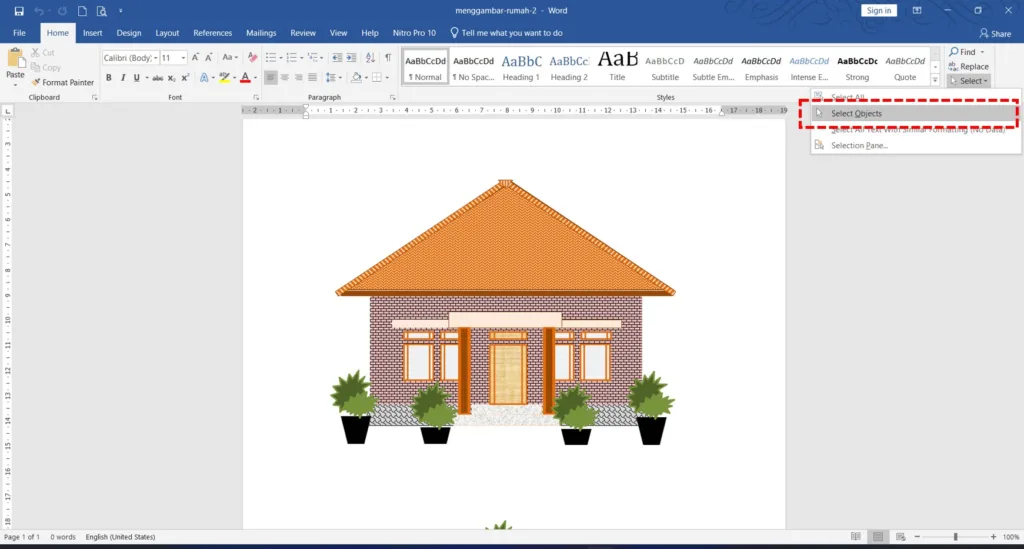
- Highlight or select all home components (object) in Word. The easiest way to select objects in Word is to use the selector tool in tabs Home, Select then select Select Objects
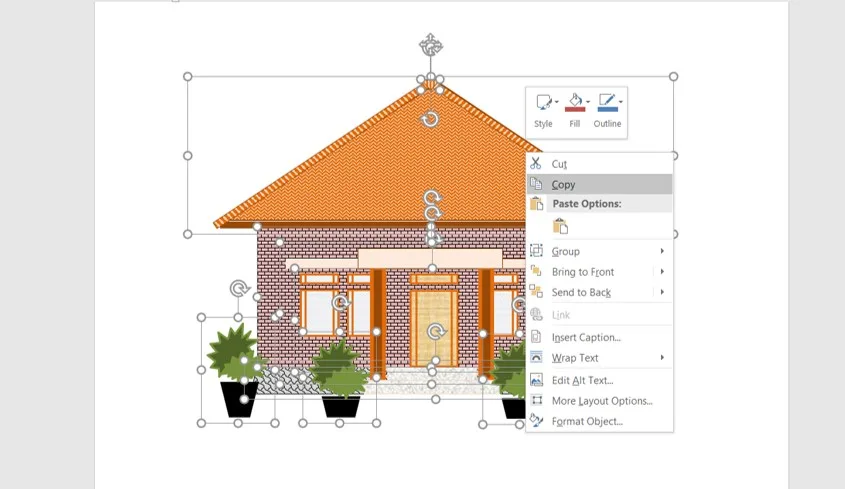
- Copy the object. Right click on the selected object and select it Copy. You can also copy it by pressing the button Ctrl + c on the keyboard
- Paste on the app Paint. Open the app Paint then right-click on an empty area in Paint and select Paste. You can also paste it with a shortcut key Ctrl + v

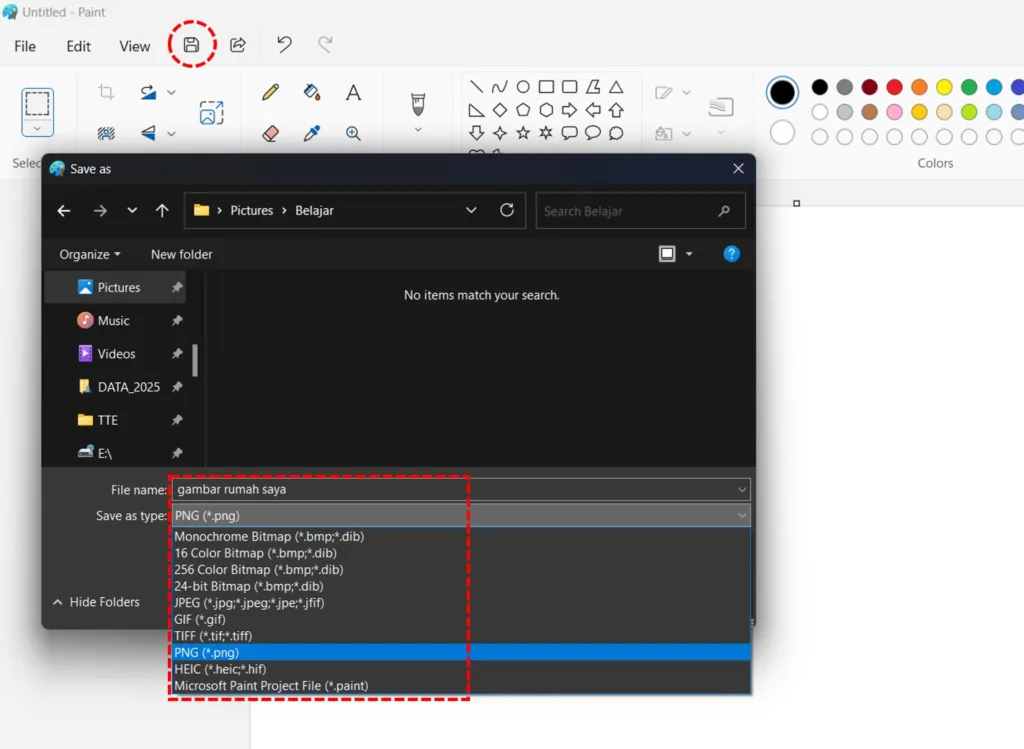
- Save the house picture as PNG or JPG or other formats. In the Paint application, select the icon Save or press Ctrl + s, then select the type of image you want, example PNG
Conclusion
You have followed the step by step guide and successfully drawn a house with Word using Shape. Shape is a feature or tool that is always present in Word, Excel and PowerPoint.
With Shapes, You can create more complex images or shapes according to your creativity and imagination. You can create pictures of buildings, mobil, location plans and so on.
After finishing making all the components of the house using Shape in Word, You can also save it as a default image with PNG or JPG type.
Also check Simple house drawing as coloring material for PAUD and Kindergarten school children this is made using Shape in Word.
If you prefer video tutorials, take a look video on how to draw a house with Word Of Channel Mahmudan.com.
The final word, that's the article title “Drawing a House with Word”. We aim this article specifically at children so that they can practice using computers in a useful and productive way.
We realize that this article still has many shortcomings, good from a grammatical point of view, writing style, as well as the steps described. We have spent a lot of time doing our best to the best of our ability and knowledge.
Your appreciation in the form of a positive assessment will increase our enthusiasm to write further articles.
Hope it is useful.

