This article will explain several ways to design tables in Word completely and in detail. By mastering the complete guide Tables in word This, will make you adept at designing and working with tables in Word.
Tables in Word can be created in various ways, including changing text into a table, designing tables and drawing tables. Besides that, You will find out how to organize the layout and direction of text in tables, color the table, merging cells and much more that you may have never known before.
This guide also reveals special tricks you can use to increase the speed and ease of using tables in Word.
The practice in this guide uses Word 2010 and Word 2021, so it can be applied to various versions of Word incl Office 365
List of contents:
Creating a Table in Word
In the Word application, You can create tables in various ways. You can create a table by selecting from the table template gallery, using the menu Insert Table or specify the desired number of rows and columns. Here are several ways you can create a table in Word.
Using Table Templates
Creating tables using a gallery of pre-formatted tables really helps in the ease and speed of designing tables. Table templates contain sample data to help you visualize how the table will look as you add data. By using a table template, You only need to change the data in the table as needed.
To create a table use a table template, do the following steps:
- Click where you want to add the table.
- On tabs Insert, in the group Table, click Table, point the pointer to Quick Tables, then click on the table template that suits your needs.

Using the Table Menu
By using the table menu, You can select the number of columns and rows directly by hovering the pointer over the desired number of columns and rows. Following are the steps for using the table menu:
- Click where you want to place the table.
- On tabs Insert, in the group Table, click Table, Then, under Insert Table, Move the pointer to select the desired number of rows and columns.

Using the Insert Table Dialog Box
Dialog box Insert Table allows you to select the dimensions and format of the table before inserting the table into the document. By using the dialog box Insert Table, You can specify as many columns or rows as possible, which the menu cannot do Table. Here are the steps to use the dialog box Insert Table:
- Click where you want to insert the table.
- On tabs Insert, in the group Table, click Table, then click Insert Table.

- In the dialog box Insert Table, in the Table size, Enter the required number of columns and rows.
- In the AutoFit Behavior, select the option to adjust the table size.

Drawing Tables
You can draw complex tables using Draw Table, for example a table containing cells with different heights or varying numbers of columns per row. To draw the table you want to create yourself, Do the following steps:
- Click where you want to create the table.
- On tabs Insert, in the group Table, click Table, then click Draw Table. After that the pointer will change to a pencil.

- Furthermore, to create the outer border of the table, draw a rectangle. Then draw column lines and row lines inside the rectangle.

Convert Text To Table
Apart from creating tables using the four methods mentioned above, Creating a table in Word can also be done by converting text into a table. To convert text to a table in Word, do the following:
- Prepare the text that will be used as a table, then insert a separator character, like a comma, semicolons or tabs to indicate where you want to divide the text into columns. Use paragraph marks to indicate where you want to start a new line. The examples in this guide use commas as column separators.
- Select the text you want to turn into a table.
- On tabs Insert, in the group Table, click Table then click Convert Text to Table.

- In the dialog box Convert Text to Table, in the Separate text at, select the column separator character used in the predefined text. In this guide, use a comma as the separating character.

- Click OK to apply. The result will look like the following image

Changing Tables in Word
You can change existing tables in Word, for example deleting lines, add columns or rows, delete rows or columns and so on. Here are some guidelines for changing tables in Word.
Changing the table can be done in the tab Table Design or Table Layout, This tab is only active if a table has been selected. In Word, The table tool has a slightly different appearance depending on the version of Word used.
Delete Table Lines
You can delete specific lines or blocks of lines in a table, this action will merge multiple table cells or delete table cells.
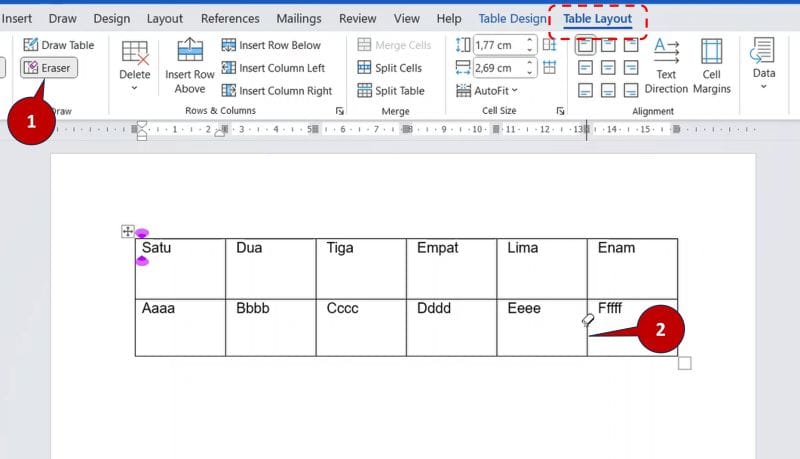
To delete table lines, select a table then do the following steps:
- Di tab Design or Table Design, in the Draw Borders, click Eraser. The pointer changes shape to become an eraser.
- Point the eraser at the line you want to erase, then click the line you want to delete.
Inserting Table Rows
You can insert rows above or below selected table rows using menu right click shortcut in the following way:
- Right-click in the cell above or below where you want to add a table row.
- So, in the shortcut menu, choose Insert then click Insert Rows Above or Insert Rows Below.

In the latest version of Word, other than the method above, buttons are also provided Plus when the pointer is directed to the beginning of the table row which functions to insert the table row.
Inserting Table Columns
Just like inserting a table row, You can also insert columns to the left or to the right of selected table columns using right-click shortcut menu, the method is as follows:
- Right-click in the cell to the left or right of where you want to insert the column.
- In the shortcut menu, choose Insert, then click Insert Columns to the Left or Insert Columns to the Right.

In the latest version of Word, other than the method above, buttons are also provided Plus when the pointer is directed to the beginning of a table column which functions to insert a table column.
Deleting Table Rows
To delete table rows, do the following:
- Select the row you want to delete by clicking to the left of the row or highlighting the entire row.
- Then right click on the selected table row, Then select Delete Rows.

Deleting Table Columns
To delete table columns, do the following:
- Select the columns you want to delete by clicking the grid line or column top border.
- Right click, then click Delete Columns on the shortcut menu.

Combining Multiple Table Cells
You can combine multiple cells into one larger cell. Suppose you want to create 1 table title that has several columns. The way to combine several cells into one cell is as follows:
- Highlight the cells you want to merge,
- Right click on the cells that have been highlighted, Then select Merge Cells

Resize Table Columns or Rows
When you create a table, There are times when the size of a column or row in a table does not match what is needed, You may need to tidy up the table by resizing the width of certain columns or the height of rows in the table. To resize table columns or rows, You can do it in the way below:
Resize columns or rows using the Ruler
Changing the size of table columns can be done by changing the column or row delimiters in the ruler. This method is needed when you only want to change the width of certain columns or the height of certain rows in the table. The method is as follows:
- Click table, then move the pointer to the column or row divider you want to resize – which is located on the ruler, until the pointer changes shape into two arrow directions.
- On the horizontal ruler, click and drag left or right to change the column width.

- On the vertical ruler, click and drag up or down to change the height of a particular row in the table.

Resize Columns or Rows using Table Properties
Resizing columns or rows using table properties can be done to resize entire columns or entire rows of a table. The method is as follows:
- Right click the table, then click Table Properties

- To change the row size, Select a tab Row then enable the checkbox Size then fill in the desired size.
- To change the column size, Select a tab Column then enable the checkbox Size then fill in the desired size

Designing Tables in Word
So that your tables can be seen clearly and are easy to read, You can layout the text in the table and add cell colors in the table. Table cell colors can be created using existing table styles or applying custom table styles.
Changing Text Alignment In Tables
To change the text alignment in a table, Do the following steps:
- Click the table or highlight the specific text you want to change the layout for, di tab Layout, in the Alignment select the alignment shape you want to apply.

Change the direction of text in a table cell
In addition to changing the text alignment, The text in the table can also be reoriented. To change the direction of text in a table cell, Do the following steps:
- Click the table or highlight the specific text you want to change the direction of, on tabs Layout, in part Alignment, click Text Direction so that the direction of the text changes as desired.

Coloring Table
There are two ways you can color a table in Word. First use the table style provided by Word, and the second is to color the table manually.
Using Table Styles
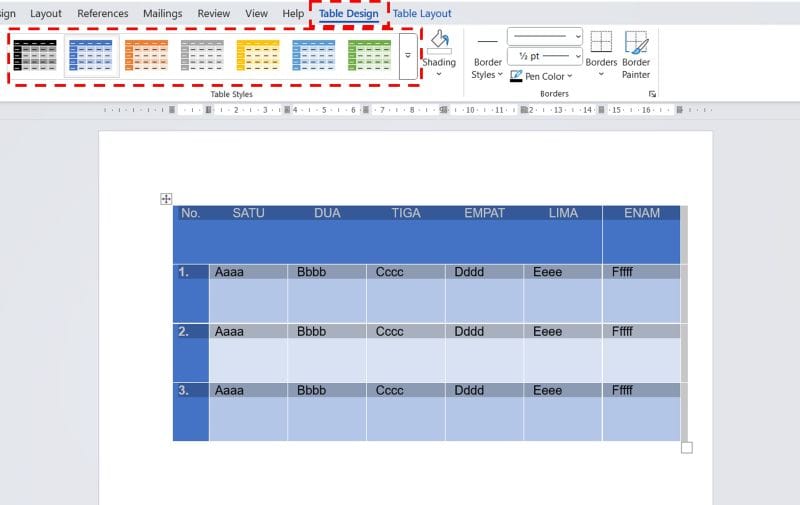
Word provides a variety of table styles that you can apply to your tables, to use it is quite easy. The advantage of using table styles is that the contrast of the table cell color with the text color is adjusted automatically, so that the table is easy to read and comfortable to look at. How to use table styles:
- Click table, then in tab Table Design, in the Tables Styles select the desired table style
Using Custom Colors
If the table colors provided by Table Styles do not match your needs, You can provide your own preferred color for the table. Here's how to use custom colors on tables:
- Highlight a table cell, then in tab Table Design, choose Shading then select the desired color.
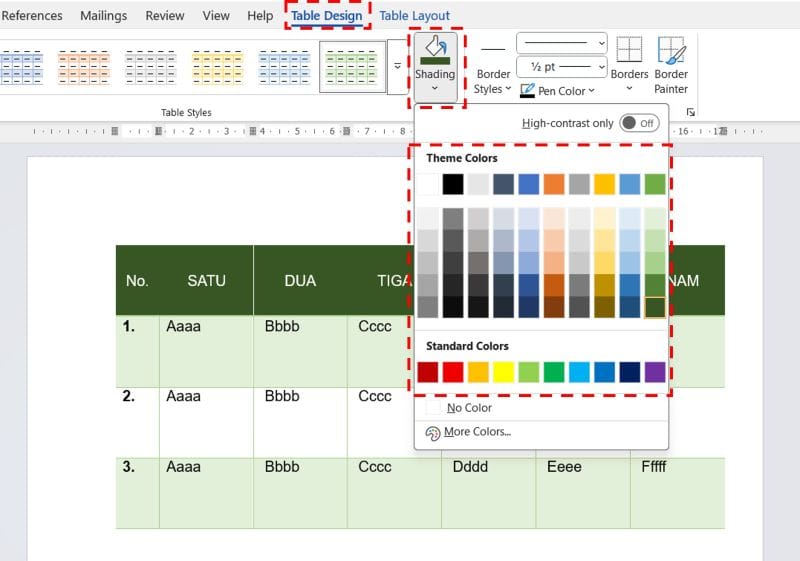
If the table cell color you choose does not have a sufficient contrast ratio with the text color, You have to color the text manually.
Coloring Text on Tables
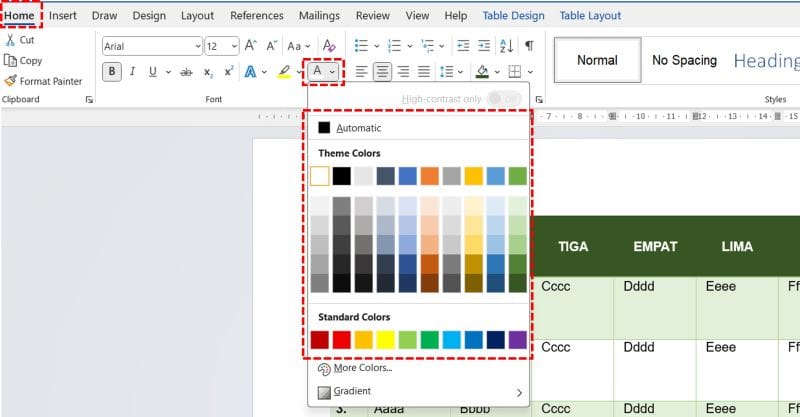
Coloring text on a table is quite easy, the same as coloring text outside the table. The method:
- Highlight the text you want to color, then in tab Home, in the Font select an option Font Color then select the desired color.
Deleting a Table in Word
You can choose to delete the entire table, or simply delete the contents of the table and maintain the row and column structure. Besides that, if you want to delete a table without losing the text in the table, You can convert tables to text. Here's how you can delete a table in Word.
Converting Tables to Text
Apart from converting text into a table as explained in the section on creating tables, You can also do the opposite, namely converting the table to text. With this way, You can delete a table without deleting the text. To convert a table to text, do the following:
- Highlight all the tables you want to convert to text
- On tabs Layout, in the Data, click Convert to Text

- Then click OK to confirm
Deleting an Entire Table
To delete the entire table, place the pointer over the table until the table move handle appears, then right click on the shift handle then click Delete Table.

Deleting Table Contents
If you want to delete the contents of the table only, place the pointer over the table until the table move handle appears, then press DELETE.
Table Specific Tricks in Word
The following special tricks will help you work with tables in Word quickly.
Move between Cells in a Table
Press the button Tab to move through cells in a table, This method is faster than using a mouse.
Using the Tab or Tab Stop Function in a Cell
If you want to use tabs or tab stops inside table cells, press Ctrl + Tab to function the tab or tab stop.
Automatically Create Numbers in Tables
Anyway, in the leftmost column of a table is filled with sequential numbers. You can automatically generate sequence numbers for columns and rows in a table, the method is quite easy, highlight some or all of the cells in the column that you want to number sequentially, then click Numbering.
With this trick, when you insert or delete rows, the number will automatically adjust.

Repeating Table Titles
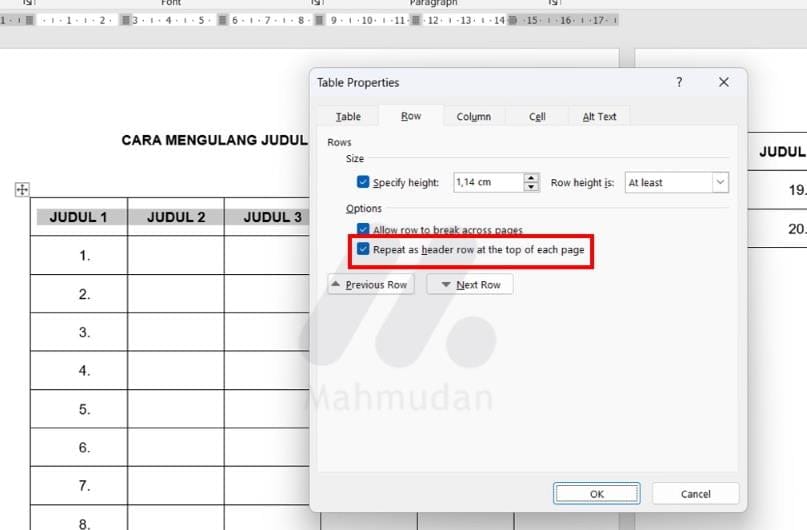
There are times when you create a long table that spans several pages of the document, You can repeat a table title in Word so that the table title or header appears on every Word page. Here are the steps to repeat table titles in Word:
- Highlight the table title
- Right click on the table title
- Choose Table Properties
- Of Table Properties, di tab Row tick Repeat as header row at the top of each page
Conclusion
Finally, Here's the guide to tables in Word. From the description explained above, You already know several ways to create tables, how to convert text to table and vice versa. You also know how to set the layout and direction of text in a table, as well as tricks for creating automatic numbers in tables.
After mastering this complete guide to tables in Word, You are becoming more adept at working with and designing tables in Word.
If you still need more guidance about tables in Word, or if you have a special trick that you need to share with other readers, please write in the comments column.
Hope it is useful….
…
…
(Huft… I'm also tired of writing articles 2200 words plus pictures…)


