This article contains a step-by-step guide to learning to type in Word, with the practice of making a Certificate. This guide is easy to follow so it is suitable for beginners who want to learn and improve their typing skills in Word.
This guide will explain the important parts you need to master in learning to type in Word properly and correctly. You can learn and practice how to choose paper size, set margins, format text, organize paragraphs, as well as how to use tab stops and copy formatting.
The steps in this guide have been adapted to the Word application 2021, but you can also practice with the Word application 2019 or older versions.
List of contents:
Introduction to Word
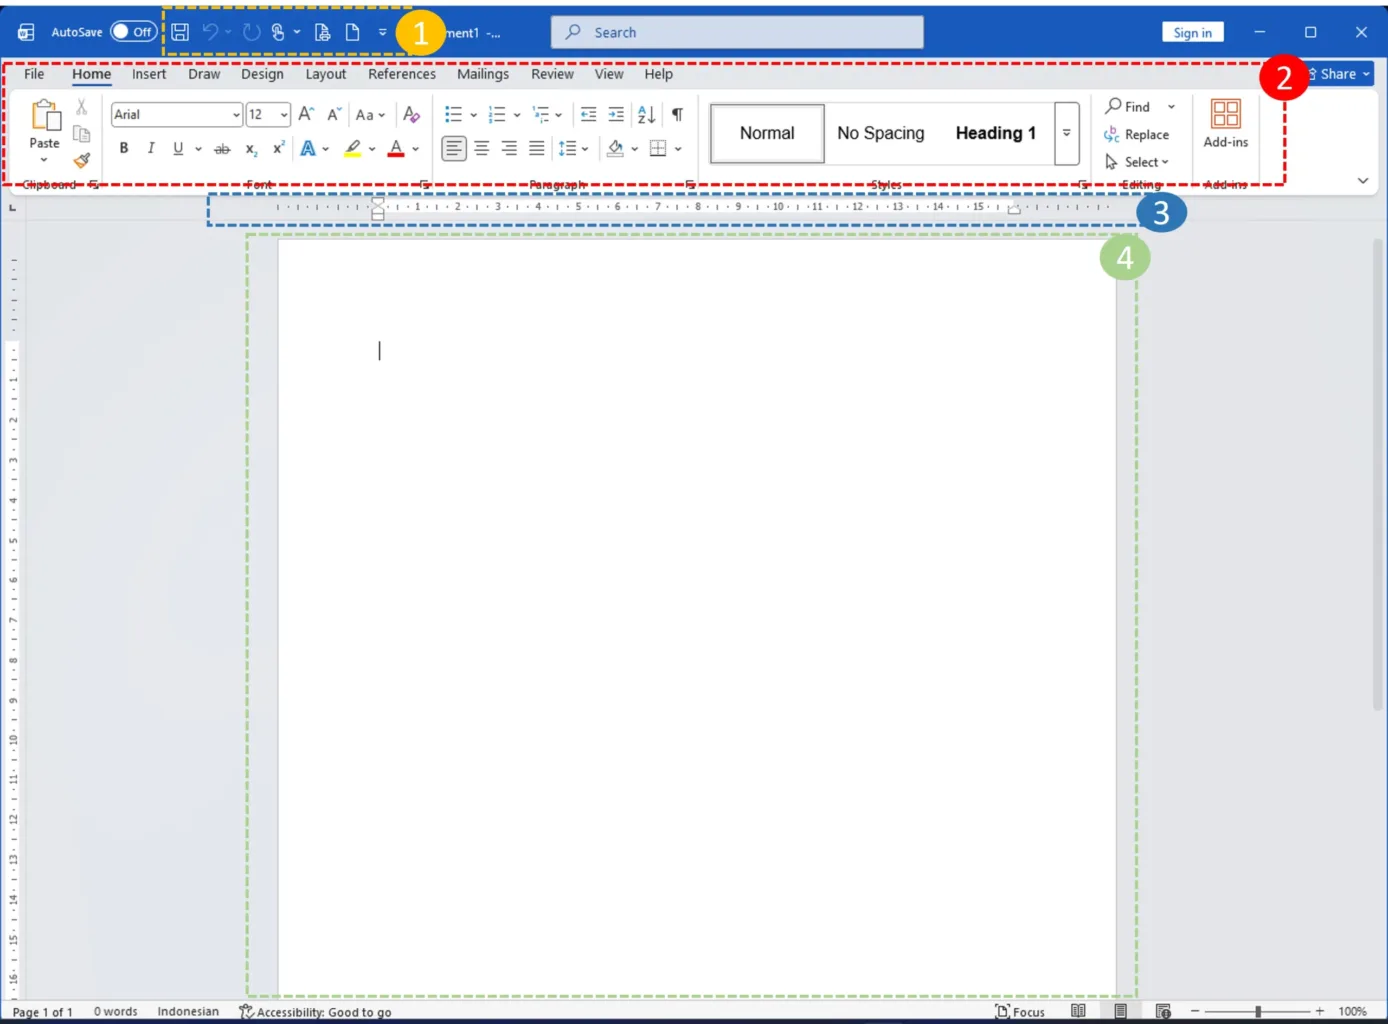
Before starting to learn to type in Word, we need to know the appearance and function of each section in the Word application. The following is a basic view of the Word application interface that you need to know:
- Quick Access Toolbar. This quick access toolbar provides shortcuts to frequently used tools such as saving (Save), cancel changes (Undo), cancel cancel changes (Redo) and create a new document (New). The Quick Access Toolbar can be customized as needed.
- Tab-tab Menu. By default, The menu tabs consist of: Home, Insert, Draw, Design, Layout, Preference, Mailings, Review, View And Help. In each menu tab there are various tools with various functions, such as changing the paper size, change the type and type of font, insert a picture, create tables and so on.
- Horizontal Ruler. Some of the functions of the horizontal ruler are to set the initial indentation of paragraphs, paragraph boundaries, paragraph breaks and tab stops (tab stop).
- Working Papers, section or place to type text. This section has the appearance of plain paper and you can adjust the size according to your needs.
Shortcut Keys in Word
To increase typing speed in Word, we can use shortcut keys using the keyboard. Some of the most frequently used keyboard shortcut keys in Word are:
- Order Copy or copy can be done with the button Ctrl + c
- Order Paste or paste can be done with the button Ctrl + v
- Order Save or save can be done with the button Ctrl + s
- To cancel the changes made (Undo) can be done with a button Ctrl + z
- To cancel cancel changes (Redo) can be done with a button Ctrl + y
- Making bold letters can be done with a button Ctrl + b
- Making letters italic can be done with a button Ctrl + i
- Making letters underlined can be done with buttons Ctrl + u
- To print typing results, you can use the button Ctrl + p
For advanced level, You can learn 10 shortcut key functions in Word to become a Professional
Learn to Type in Word
In learning to type in Word, we will practice creating a document with the title Certificate. This practice aims to make it easy for you to understand the basic parts and how to work using the Word application.
By practicing making a certificate document with this simple concept, You have mastered the basics of typing in Word properly and correctly.
Selecting Paper Size
The first step you need to do is choose the size of the paper. When you start typing in Word, It is very important for you to choose the paper size so that the printed results match the paper size installed in the printer.
You can adjust the paper size according to the amount of text or type of document you are creating. Selecting the paper size at the beginning also aims to avoid changing the layout of the manuscript or other content in the Word document.
In general, The paper size that is widely used in offices is size A4 and size F4 or Folio. As a first exercise in learning to type in Word, You choose the paper size A4.
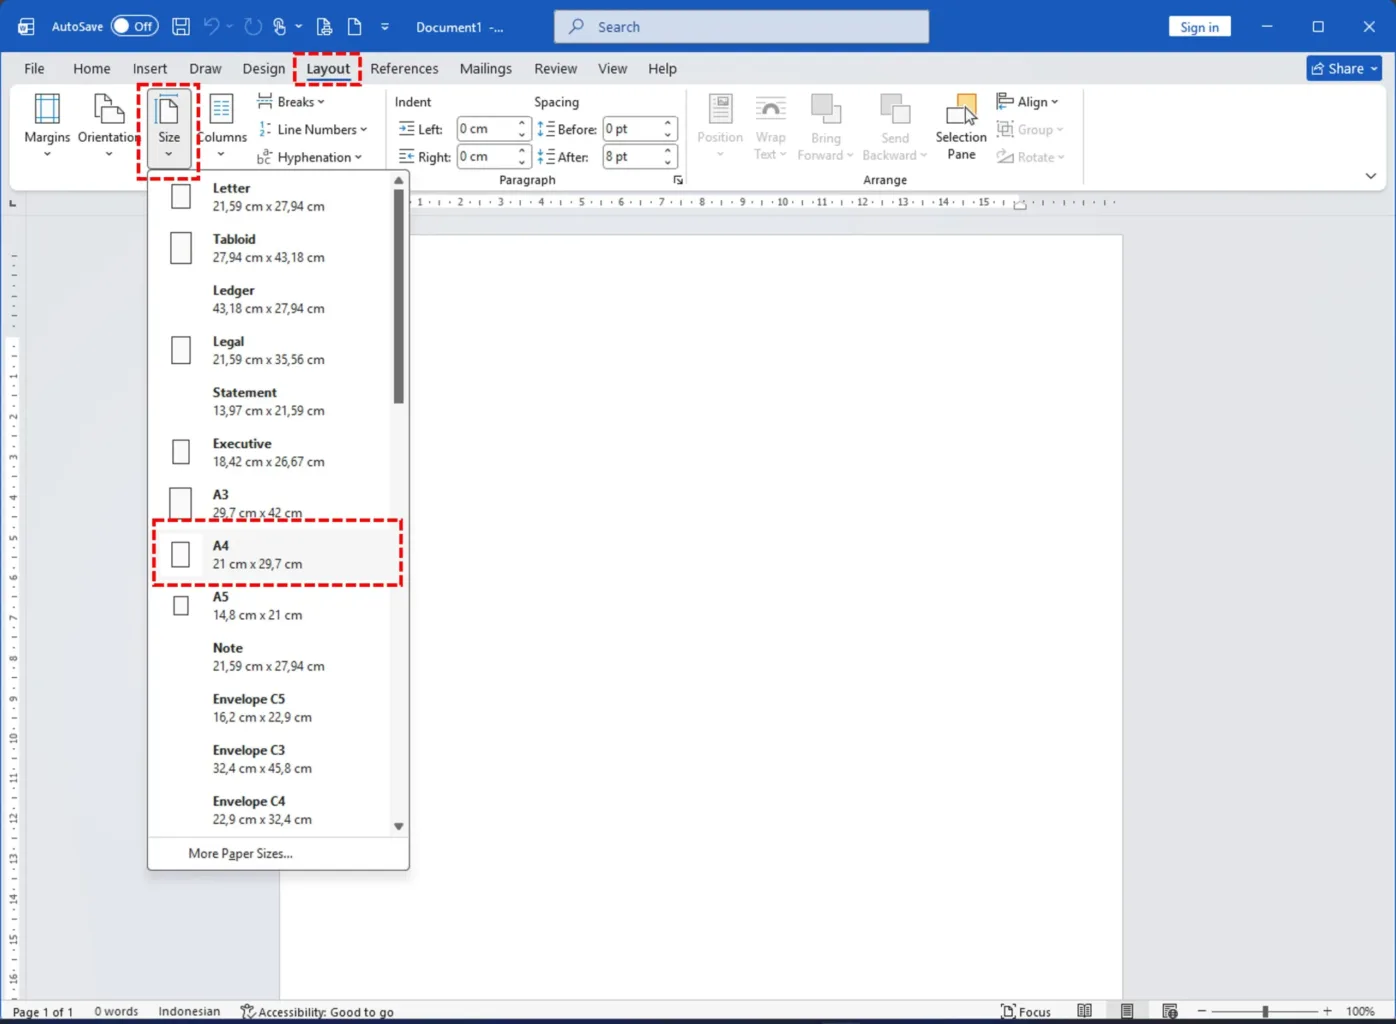
To select the paper size in Word, click tab Layout, click Size then select paper A4 with size 21 cm x 29,7 cm
If you want, You can also choose another size that suits the paper size in the printer, for example size F4 or Folio.
If the Word application you are currently using does not yet list the F4/Folio paper size, you can added F4-Folio paper size to appear in the paper size options in the Word application.
After selecting the appropriate paper size, The next step is to determine the paper margins.
Determining Paper Margins
Paper margins are borders that function to regulate the distance of text or other components to the edge of the paper. For determine paper margins in Word, Do the following steps:
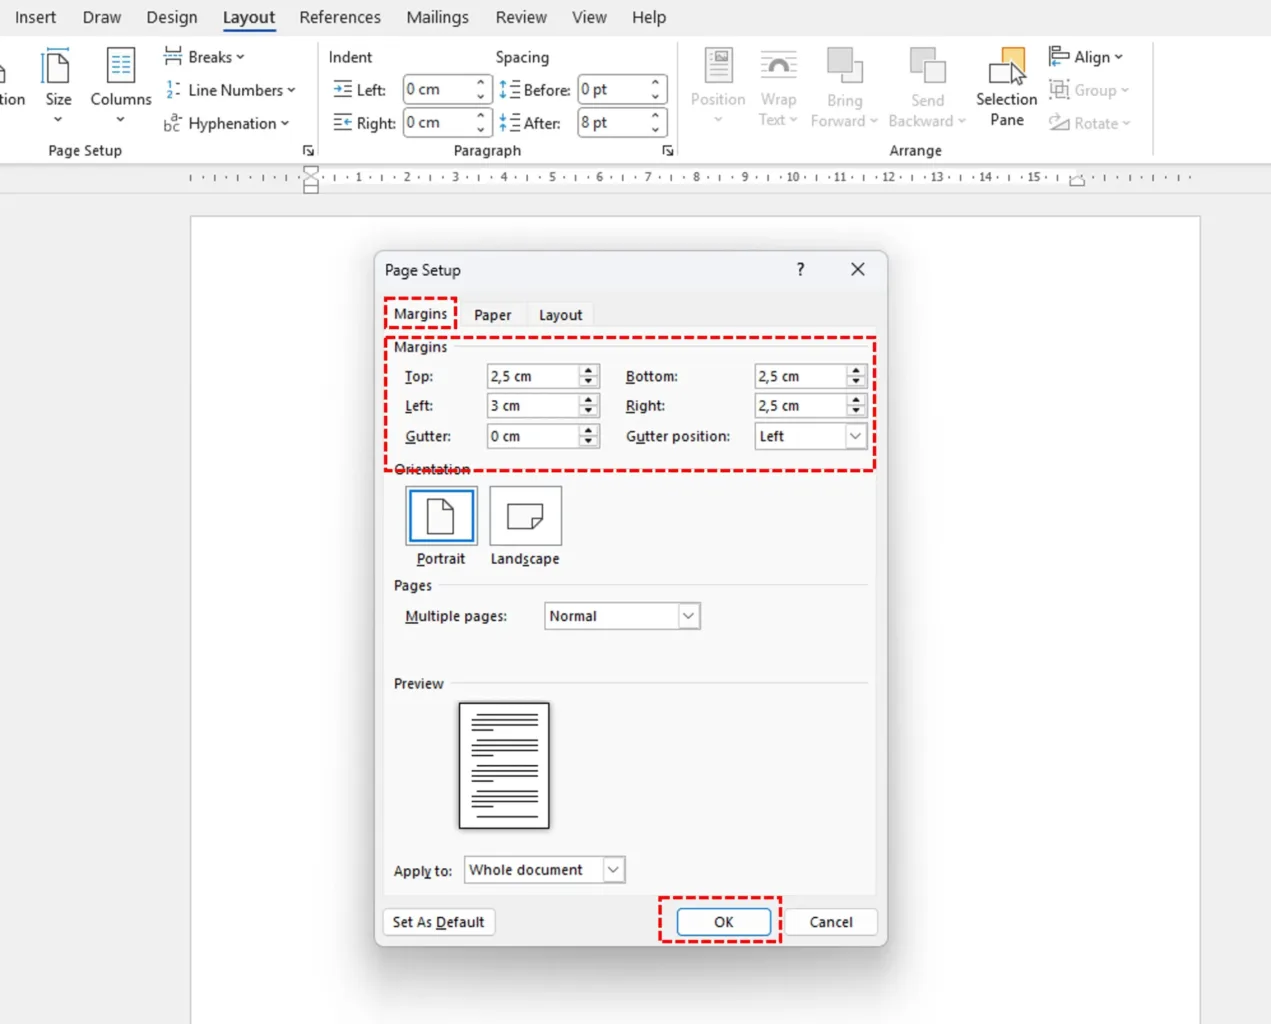
- On tabs Layout, choose Margins then select Custom Margins. Then a dialogue box will appear Page Setup
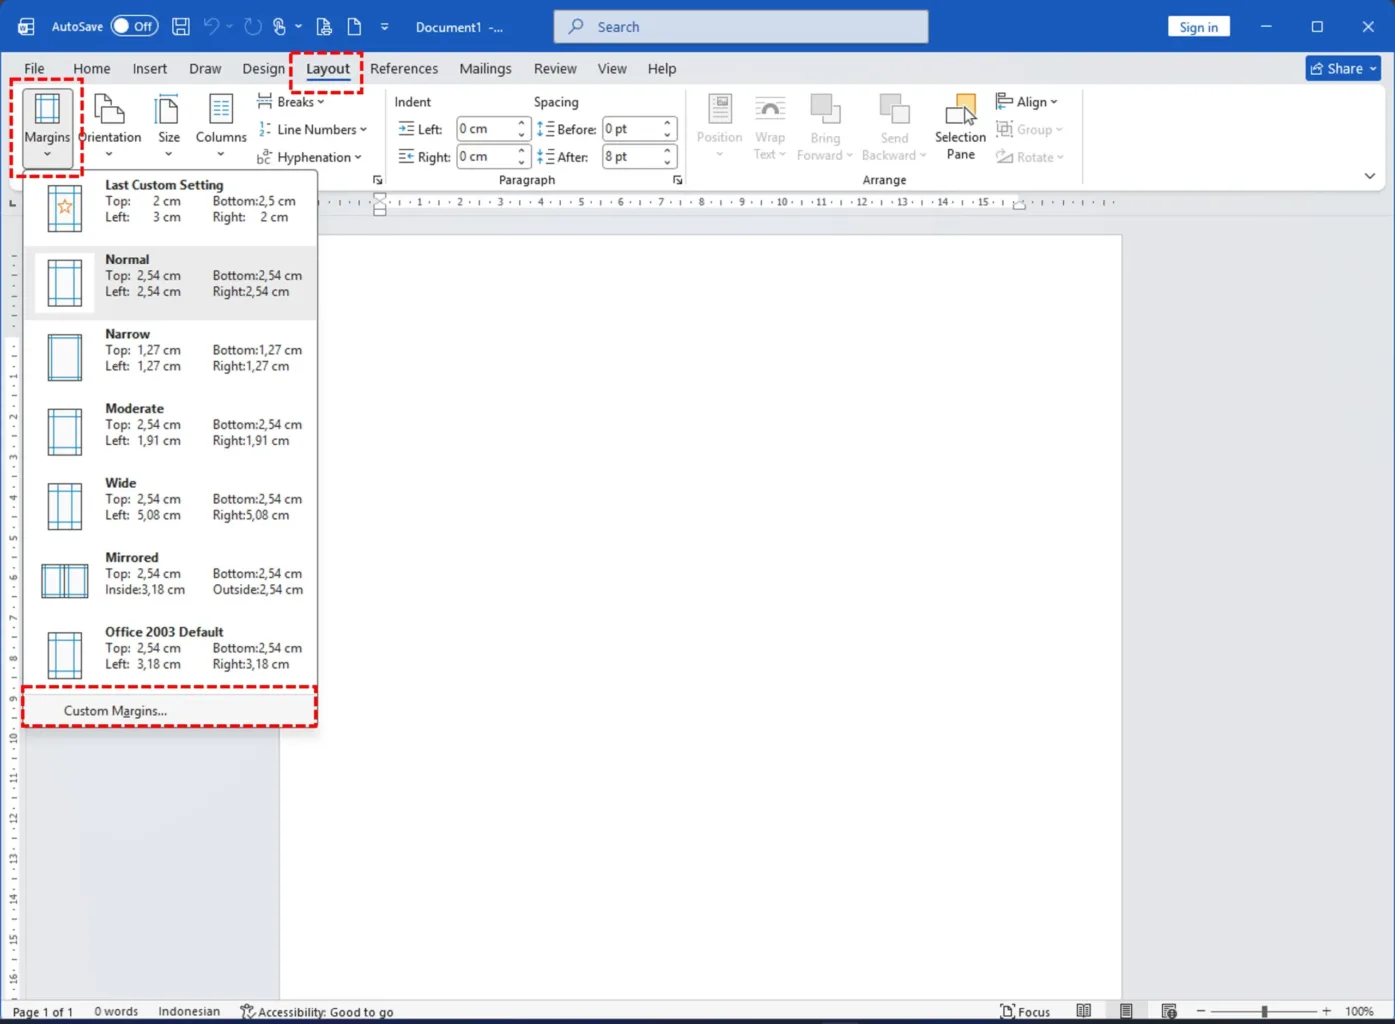
- In the dialog box Page Setup, di tab Margins, in the Margins section, enter numbers for the fields Top, Left, Bottom, And Right as needed. As a second exercise learn to type in Word, set the margin as follows:
- Top: 2,5 cm
- Left: 3 cm
- Bottom: 2,5 cm
- Right: 2,5 cm
- Then click OK to apply
Typing Text
Typing text is done on work paper, In the Word application, work paper is a plain white area that resembles white paper under a horizontal ruler.
The position of the letter you are going to type is marked with a flashing cursor. On a new document sheet, By default the cursor will be at the top left of the worksheet.
As practice learning to type in Word, Type the following text as the title of the letter you will write:
surat keterangan penghasilan After typing the text, we will continue with formatting the text.
Formatting Text
To format text, the first step you have to do is highlight or select the text you want to format.
To select text, you can do this by double clicking on the text, or click at the beginning of the text and drag to the end of the text.
Making Uppercase or Lowercase Letters
For the title “income certificate” just typed, all letters should be capitalized, if you type it in lower case, then you can change it to uppercase.
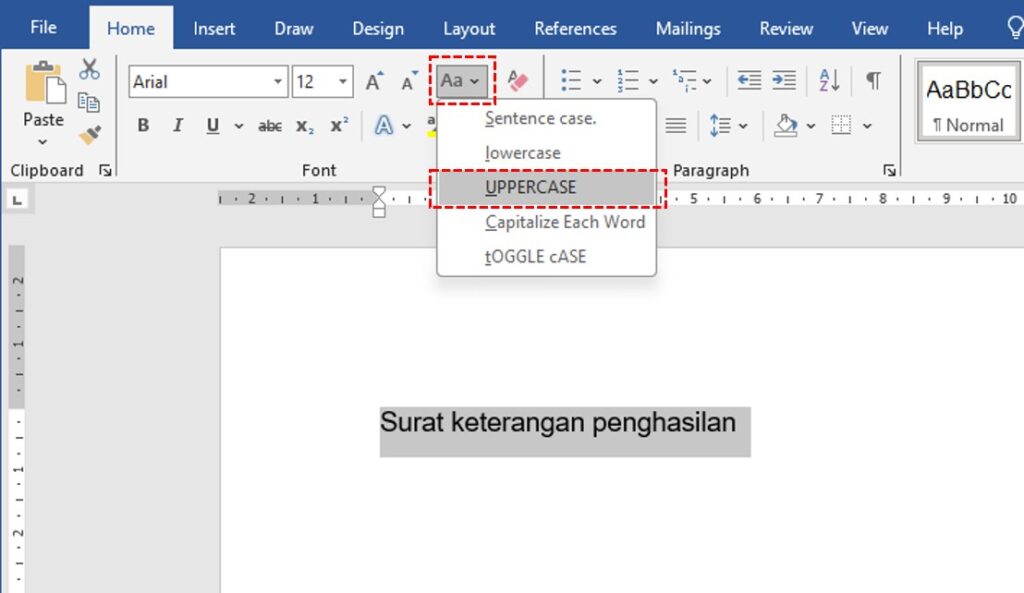
On tabs Home, in the Font, there is a tool to change the letter format from lowercase to uppercase or vice versa. To change lowercase text to uppercase, do the following:
- Select all the text you want to convert to uppercase
- then on the tab Home click Change Case then select UPPERCASE.
As an exercise, change all title text “income certificate” become “INCOME CERTIFICATE” use Change Case.
Changing Font Style and Size
In Word 2010, By default the font used is Calipers size 11. In typing practice in Word, make this Statement Letter, The text format that must be used is a type font Arial, title uses size 14 in bold style (Bold) and underlined (Underline).
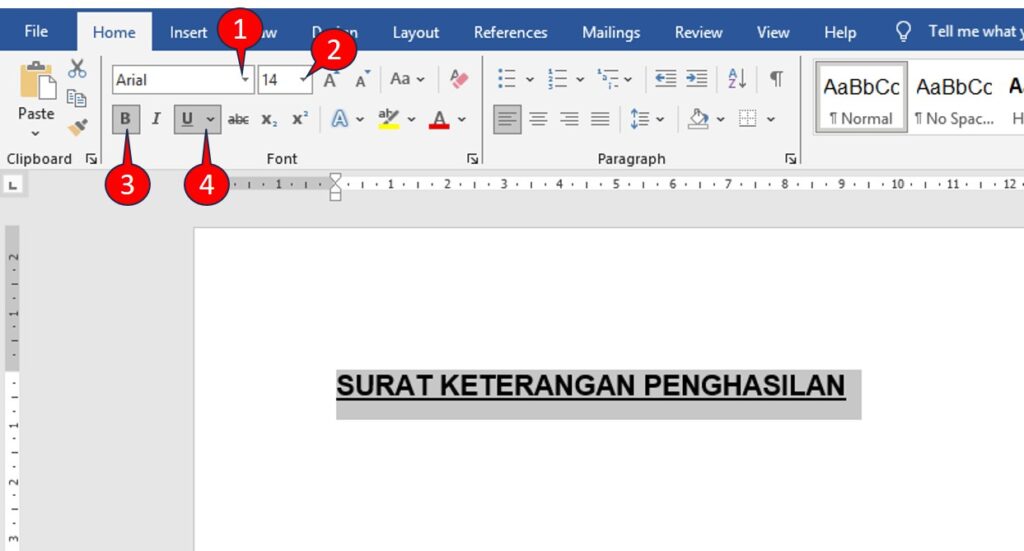
To format text in Word to match a specified font style and size, select all text, then on the tab Home, in the Font, select font style and size.
As practice learning to type in Word, select all title text then set as follows:
- Font Arial
- Size 14
- Bold letters
- Underlined
After creating a title, The next step is to create the body of the letter in a new paragraph.
Create a New Paragraph
To create a new paragraph in Word is very easy, just press the Enter key once. In the Word application, The text format in the new paragraph automatically follows the format in the previous paragraph.
In this exercise, It is determined that the title and contents of the letter are spaced one paragraph apart. The format used in the contents of the letter is font Arial size 12, not bold and without an underline.
Before starting to type the body text of the letter, change the text format back to normal (not bold and not underlined) and size 12. Then press Enter twice to start the text in the next paragraph.
In the body paragraph, The beginning of each sentence begins with a capital letter. To use capital letters, press the button Shift on the keyboard.
Advanced learning to type in Word, Type a sentence like the following below:
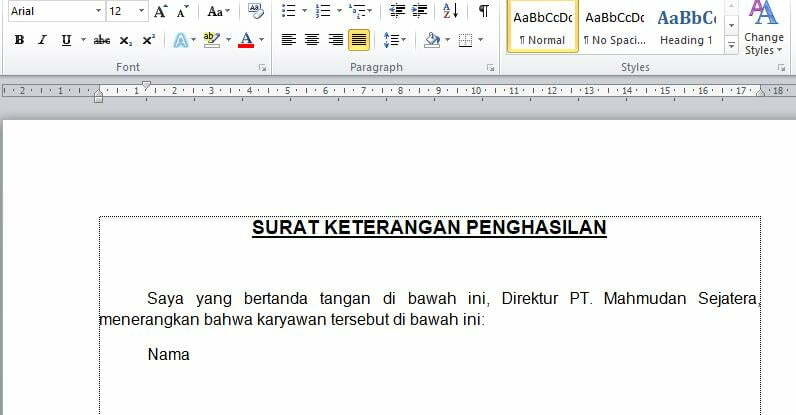
Saya yang bertanda tangan di bawah ini, Direktur PT. Mahmudan Sejahtera, menerangkan bahwa karyawan tersebut di bawah ini:
After typing the text in a new paragraph, The next exercise is to organize paragraphs.
Organizing Paragraphs
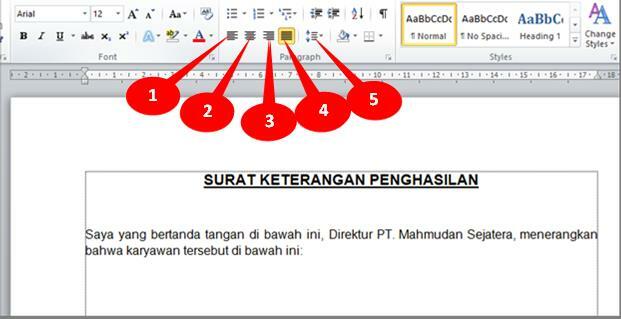
On tabs Home, in the Paragraph, There is an option to set paragraphs. You can set paragraph alignment and spacing between lines in paragraphs. The following displays the paragraph settings:
- Flat left,
- Flat middle,
- Align right,
- Align both left and right sides,
- Setting the distance between lines.
Set paragraph alignment.
To set paragraph alignment, Click on the paragraph you want to organize, then on the tab Home in the Paragraph, Select the desired type of paragraph alignment.
In this exercise learn to type in Word, set the title paragraph to be centered, while the body paragraphs of the letter use both left and right sides aligned.
Set the distance between lines.
On tabs Home, in the Paragraph, we can determine the spacing between lines in a paragraph. Besides that, we can also add space before and or after the paragraph.
In this exercise, The distance between rows used is 1,15 without adding space before or after the paragraph.

Indent the first line of a paragraph.
Indentation is additional distance or space used to indent text (or other elements) from the left or right page border or margin. To indent the first line of a paragraph, place the cursor at the beginning of the paragraph and then press the button Tab on the keyboard.
When we press Enter to start the next paragraph, its first line will be indented automatically.
As practice learning to type in Word, add indentation to the first paragraph. Then at the end of the first line of sentences, press Enter then type No on the second line.
Using Tab Stop
An important part of learning to type in Word is using tab stops (tab stop). By using tab stop, we can determine the starting position of a text by pressing a button Tab one time.
In this exercise learn to type in Word, in paragraphs that contain data such as names, position and others, The data name and contents are separated by a colon. Ideally, the position of the colon is set using the tab stop. Why should you use tab stop?
With tab stop, we can make the same tab stop for each paragraph even though the length of the text in the paragraph is different. Besides that, position tab stop can be set to the left, to the right, or to the middle.
Create a Tab Stop
To create a tab stop, Do the following steps:
- Place the cursor at the end of the text No, then click on the horizontal ruler where we want the tab stop. In this exercise, tab stop is created in position 5cm from the left margin (look at the ruler). You can adjust it according to your needs.

- After click on the ruler, A tab stop marker will be created and displayed on the ruler.
- Press tab, then type a colon.
- The colon will be aligned with the tab stop.
When we press Enter to start the next paragraph line, the paragraphs will have the same tab stops.

As practice learning to type in Word, continue typing text on the next line, like NIK, Department and others followed by a colon on the tab stop. Type text as shown below:

Set Tab Stop
Apart from setting the tab stop position, we can also adjust the text alignment using tab stops. At each tab stop, we can set left alignment, center or right. Besides that, we can also add Leader in the form of dots, underline or dotted line.
As an exercise using tab stop, on the Basic Salary line, after the colon will be filled with numbers. Numbers are written right-aligned, for that we need to make a tab stop with flat right. Before numbers, we add Leader in the form of dots.
To make the tab stop right aligned with Leader dot, dot, dot, follow these steps:
- Place the cursor at the end of the text, namely the colon after the Basic Salary.
- Then on the horizontal ruler, double click on distance 10cm, then the dialog box Tabs will be open. In the dialog box Tabs, part Alignment choose Right. In part Leader choose 2 ……(dot, dot, dot).
- Then click OK to confirm.
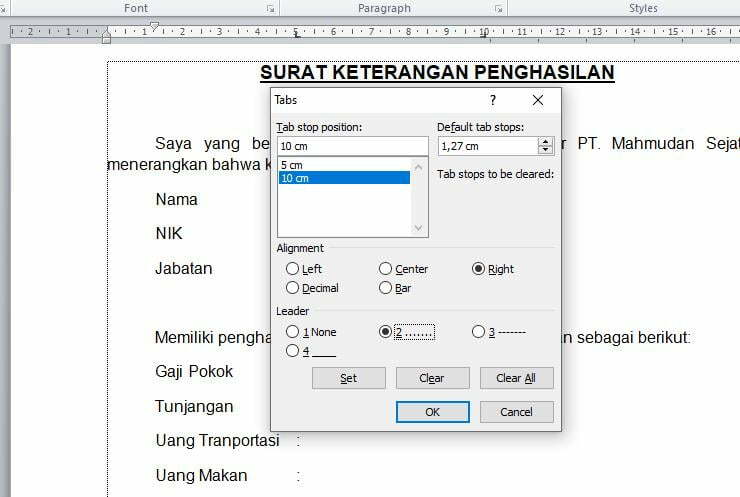
After using tab stop align right with Leader dot, dot, dot, The result will look like the following image:

Copy Format
If we have determined the format for a paragraph and want to apply it to other paragraphs, we can use tools Format Painter to copy the format.
In this practice of learning to type in Word, we have formatted the Base Salary paragraph using tab stops with dotted Leaders. To apply this format to the next paragraph, we can copy existing formats using Format Painter, so there is no need to create a new tab stop.
Using Format Painter is very easy, Just click on the paragraph whose format you want to copy, then click the icon Format Painter, then click on the paragraph you want to apply.
As practice learning to type in Word, click on the Basic Salary line and click Format Painter, a brush icon attached to the pointer, Then select (click and drag) from the Allowances paragraph to the Net Salary paragraph.

After using Format Painter, The Basic Salary to Net Salary lines have the same tab stop. Press tab after the colon on each of these lines. The result will look like the image below:

The next stage is to write a closing sentence. Place the cursor at the end of the Net Salary line Enter twice to create a new paragraph.
Keep in mind, every time you press a button Enter, The new paragraph will inherit the formatting of the previous paragraph.
Deleting Tab Stops
At the moment, in this exercise to learn to type in Word we have one tab stop flat left and one tab stop flat right. We can remove unnecessary tab stops.
When typing the final paragraph, we don't need the right flat stop tab, then we will delete the right aligned tab stop.
To delete a tab stop is quite easy, Click the tab stop you want to delete then drag it down. Or, Double click the tab stop to open the dialog box Tabs open, then select the tab stop position you want to delete then click Clear Then OK.
As an exercise, remove tab stop in position 10cm.

After removing the tab stop align right in position 10cm, now we only have one left aligned tab stop in position 5cm, we continue by typing the closing sentence. The closing sentence that we will make in this practice of learning to type in Word is like the example below:

After typing the closing sentence, Enter twice to move to a new paragraph.
Move Tab Stop
After adding a closing sentence, In each letter, information about the author of the letter is required. In the exercise of making this affidavit, The information that needs to be created is information about the place, date, department, and the name of the person who made the statement.
The position of the information text in the letter varies depending on the party who wrote it, some are on the left and some are on the right. To set the position of the text, we can take advantage of the existing tab stop and move its position to the left or right.
Moving the tab stop is quite easy, click and drag the tab stop to the desired position.
In this exercise learn to type in Word, we still have a tab stop flat left in position 5cm. Reposition the tab stop so that it is in position 10cm on a ruler, After pressing tab, the cursor position moves parallel to the number 10, as in the following image.

After moving the tab stop, type the text about the required information as in the example below
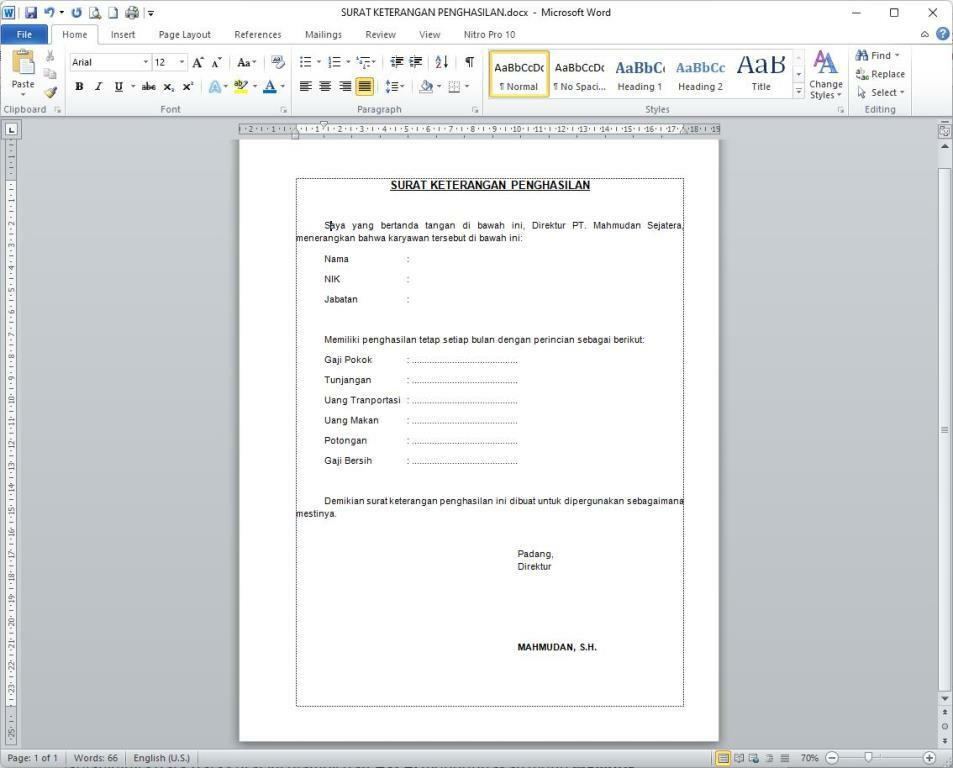
After adding information about the letter maker such as place and date, position and name, then the practice of learning to type in Word - making a statement letter has been completed.
If you want, You can download example of a Letter of Evidence / Statement which is made according to this guide to learn to type in Word.
If you make a large number of income certificates or other letters, which has the same format, you can using Mail Merge with Excel as the data source for efficiency, accuracy and consistency across documents.
If the letter you want to create contains a table, Complete guide to creating tables in Word this will help you.
If you make an official letter with a letterhead, You can learn how to make a letterhead in Word.
Conclusion
After following this guide to learning to type in Word, You already know how to use the basic parts needed to type in Word. You can understand how to type in Word properly and correctly.
Hopefully this learning guide for typing in Word can increase your knowledge and improve your skills in typing in Word.
Do you agree with this learning guide for typing in Word to be continued at the next stage?? Write your opinion in the comments column
If you prefer video tutorials, watch the useful video tutorial at This YouTube channel


